Category Archives: Fruit

Berry Beety Salad

Nothing says summer to me as much as blackberries.When I was a kid I would stuff my face with as much as I could find, and wore the scratches and stains with pride. Here in Oregon, it seems they are always growing everywhere, along sides of roads, in fields, in random bunches here and there, in most people’s yards. We are going to have a bumper crop in our backyard this year. I don’t know anyone who actually planted their blackberries, but everyone seems to have some. Although whatever variety of berries in my yard isn’t quite ripe yet (we counted 5 black ones today, but the rest are still green or red), farmer’s market was bursting with them. I picked up some Marion berries (a local variety of blackberry) that tasted just like sunshine.

In my farm box this week there were greens, greens and more greens. I still have some lettuce from last week too, so I’ve committed to eating some sort of lettuce based meal every day this week in hopes of using it all up. Last night I roasted beets (also in my box this week, yay!), made a simple but lovely blackberry vinaigrette and ended up with this beautiful and delicious salad. When salads taste like this it is far from a hardship to eat them every day.

Beets, berries, goat cheese, oh my!

Beets, berries, goat cheese, oh my!

Berry Beety Salad

2-3 cups leaf lettuce
1/2 cup blackberries plus a few for dressing
3-4 beets
1-2 oz. goat cheese
1 tbsp. balsamic vinegar
1 tbsp. olive oil
1/2 tsp. dijon mustard
Salt & pepper

Heat oven to 400˚. Place beets on a baking sheet. Drizzle with a bit of olive oil. Bake for 30-40 minutes until a fork goes in easily when you stab them. Let cool. Peel if desired and cut into bite size pieces.

In a small bowl crush a few blackberries with a fork. Add balsamic vinegar, olive oil, dijon and salt & pepper. Whisk together to make dressing.

Pile lettuce on a plate. Top with beets and blackberries. Drizzle with dressing and top with goat cheese. Finish with a few grinds of black pepper. Serves 1-2. I ate all this myself, so multiply recipe accordingly.

Tagged , , , , , , ,

I Pickled Some Beets and Made Many Salads

Many beets came my way this month. I’m not complaining. I’m a fan of the humble beet, although I know there are many who don’t agree. To use a number of these all at once, and to spare the beet haters in my household from having to eat them, I decided to pickle some.

I have not really ventured into the canning realm, so for me, a quick-pickle was the perfect solution. This was a really simple preparation and made a small batch (although it’s easy to double or triple as needed). Plus the added benefit – they are ready to eat in just a few days!

These two salads are pretty typical in my house. I like sweet and sour and salty together and for me, a salad is only dinner if it is not boring. These are far from that. You can make either with simple roasted beets (or even raw ones sliced thinly) but I really enjoy the pickled beets for some extra zip. They pair well with the sweet pears and salty feta for a very satisfying and balanced bite. Since these are pretty strong flavors on their own, opt for a simple dressing of oil and vinegar to bring out the flavor of the ingredients.

Pickled Beets
(adapted slightly from Alton Brown’s recipe)

2 pounds beets, scrubbed
Olive oil
Salt & pepper
1 cup water
1 cup red wine vinegar
1/2 cup sugar
1 tsp. salt

On a large piece of foil, put beets in the center. Sprinkle with salt & pepper, drizzle with olive oil and wrap up. Bake at 400˚ for 40 minutes until tender. Remove from oven, let cool, peel and dice or slice. Fill mason jars (I filled two with the beets I had).

In a saucepan, combine water, vinegar, sugar and salt. Bring to a boil. Boil one minute. Pour liquid over beets in jars. Put lids on and put in the fridge. Let them pickle for 3-7 days before eating. They will last about a month in the fridge.

Beet, Pear and Feta Salad

Beet, Pear and Feta Salad

Beet, Pear and Feta Salad

Mixed salad greens
1 fresh pear
1/2 cup pickled or roasted beets
1-2 oz. feta or goat cheese
2 tbsp. walnuts, toasted
Drizzle of olive oil and red wine vinegar
Salt & pepper

Layer ingredients on a plate, drizzle with oil and vinegar, sprinkle with salt and pepper and dig in!

Or change it up ever so slightly for a more hearty dinner version:

Fall salad with mushrooms, beets and pears.

Fall salad with mushrooms, beets and pears.

Fall Salad with Mushrooms, Beets and Pears

Mixed salad greens
1 fresh pear
1/2 cup pickled or roasted beets
1-2 oz. feta or goat cheese
1/2 cup mushrooms (I used shiitake mushrooms but any kind will work)
A few green or black olives
Drizzle of olive oil and red wine vinegar
Salt & pepper.

In a small sauté pan, cook the mushrooms in just a tiny bit of olive oil until slightly softened and warm. Layer the other ingredients on a plate. Top with mushrooms. Drizzle with oil and vinegar. Sprinkle with salt and pepper. Yum.

Tagged , , , , , , , ,

CSA Week 2: Drink Your Greens!

I picked up my second CSA farm box from Sun Gold Farms this weekend and my fridge is once again overflowing with produce. In this box: A huge head of leaf lettuce, a big cabbage, fava beans, sugar snap peas, curly kale, parsley, five zucchini, spring onions and a basil plant. I used almost all of last week’s produce but still have a partial cabbage and some mint, plus some broccoli that I picked up somewhere. I also bought blueberries and tomatoes at the market. Obviously there is plenty of salad on the menu this week, plus some broccoli and spring onion soup and probably some slaw and at least one other thing involving cabbage. But yesterday, it was all about the smoothies.

Yesterday I was having some issues. Issues with being a total klutz, to be exact. Every time I turned around I was knocking something over or dropping something or running into something. You would think smoothie making would be a pretty safe choice, since chopping and/or major cooking could lead to disaster on days like this. So I threw everything in the blender, and pressed go while I scrambled a couple eggs to go with it. As I’m beating the eggs, I noticed that as the blender is blending, it’s sort of traveling along the counter top with the vibration, and out of the corner of my eye I see it start to tip off the counter. In a flying leap I lunged over there and caught the floor-bound blender (as it’s still blending) one-handed (!) and as I’m setting it safely back on the counter I bumped the bowl of scrambled eggs and further scrambled them as they fell to the floor, splattering everywhere. I turned off the blender (yay, me!), cleaned up eggs, rescrambled, cooked eggs, and then poured my smoothie into glasses, dribbling a bit down the sides, but happy with the consistency, which was no doubt improved by its brief flight. I don’t recommend trying any of that at home.

If you don’t like to cook your greens, and you’re sick of eating salad, stuff those greens into a smoothie and drink them instead. You can change up the recipe to your liking depending on what fruit you have available, but I find the berries usually mask the taste of the greens, some stone fruit or banana adds sweetness and adding some herbs or citrus adds a bit of brightness as well. My kids love these and never complain about the bits of greenery I add to them. With some of the more hardy greens, be sure to have plenty of liquid and blend a little longer than usual. If you have a wimpy blender I’d probably go with spinach instead of kale since it liquifies much easier. I usually freeze all the fruit, but if your fruit is not frozen, add some ice cubes to give it that smoothie texture.

Blues and Greens Smoothie

Blues and Greens Smoothie

Blues & Greens Smoothie

2 big leaves of kale, ribs removed
1-2 cups blueberries, frozen
2 nectarines (fresh or frozen)
Mint – a couple of sprigs, stems removed
1 big scoop of plain yogurt
A few ice cubes if you want it extra cold or if your fruit isn’t frozen
1-2 cups sparkling water, juice, coconut water, regular water or milk (I like the sparkling water because it makes it just a tiny bit fizzy!)

Blend everything together thoroughly. Kale is a pretty hardy green, so I usually add some extra liquid and let it blend a long time to really pulverize it so I’m not chewing my smoothie, because nobody loves that. Add a little more liquid if needed to make it a drinkable consistency. Pour into glasses and enjoy while it’s cold. This made enough for 2-3 servings.

Tagged , , , , , , , , ,

Fish Tacos with Strawberry Salsa

At farmer’s market this week I was shocked to still see strawberries. In October? Yep. There might be something to this climate change thing after all. In any case, as long as they are here I’ll keep eating them. The other thing that is plentiful, huge and super cheap right now is cabbage. Let me tell you I have become very creative with using cabbage. It’s just so hard to pass up such a good deal.

These tropical tacos are easy to make, and simple to modify with different fruits based on whatever you have available. This was a particularly tasty combo and the first time I’ve paired strawberries and fish, but it really worked well!  Plus they are so colorful they practically jump off the plate and into your mouth. If you can’t find mahi mahi, substitute any firm, mild white fish and it will work just fine.

One of the best ways I’ve found to get my kids to eat fish is to put it in a taco. Smothering it with fruit is just taking it up an extra notch in their book.

This recipe made more fruit salsa than we needed for the tacos, but don’t worry! The stuff is delicious on its own, or on top of a green salad, mixed into yogurt, or served over ice cream!

Fish Tacos with Strawberry Salsa

Fish Tacos with Strawberry Salsa

Mahi Mahi Tacos with Strawberry Salsa

Fish:
1 pound mahi mahi or other firm white fish
Lemon pepper
Ground chile powder (I like the plain ground ancho chile powder but if you have regular chili powder blend that will work fine as well)
Salt

Strawberry Salsa:
1 pint strawberries, chopped
1-2 cups pineapple, chopped
1 red or green chile or jalapeno, minced
2-3 tbsp. cilantro, minced
1/3 cup red onion, diced
Juice of half a lime
Ground chile powder
Dash of salt

Cabbage:
2 cups red cabbage, thinly sliced
2-3 tbsp. sour cream (or you can sub mayo or greek yogurt)
Juice of half a lime

Corn or flour tortillas

In a mixing bowl mix all ingredients for the salsa. I do this first so it can kind of marinate together while everything else is cooking.

Strawberry Pineapple Salsa

Strawberry Pineapple Salsa

In another bowl, mix cabbage, sour cream and lime juice. Set aside.

Cabbage mixture  to top off your taco!

Cabbage mixture to top off your taco!

Wrap tortillas in foil and stick in the oven to warm while you cook the fish.

Cut fish into strips or squares. Sprinkle fish with salt, lemon pepper and chile powder on both sides.

I don't measure the spices, just sprinkle to your heart's content.

I don’t measure the spices, just sprinkle to your heart’s content.

Heat a bit of oil in a large skillet. Place fish in the skillet, making sure not to crowd the pan. Do it in 2 batches if needed. Cook 2-3 minutes on each side until cooked through and lightly browned.

Build your taco with a tortilla, a couple of chunks of fish, top with strawberry salsa and cabbage!

Yeah, it's a total mess when you eat it, especially if you go crazy overfilling it like this. But it's worth it! For less mess, go a little lighter with the fillings.

Yeah, it’s a total mess when you eat it, especially if you go crazy overfilling it like this. But it’s worth it! For less mess, go a little lighter with the fillings.

My son Luke prefers his taco deconstructed so he can eat it with a fork:

Don't like wrestling with messy tacos? Make a taco plate instead!

Don’t like wrestling with messy tacos? Make a taco plate instead!

Tagged , , , , , ,

Fruity Salad with Basil Vinaigrette and Roasted Polenta

It’s that time of year again when salad becomes an every other night menu item in my house. This is partially due to the no air conditioning equals minimal cooking policy. And partly because I’m trying to fit into my summer clothes from last year.

In any case, salad doesn’t have to be boring. This one has an easy, bright vinaigrette, fresh fruit and yummy roasted polenta rounds to go with it.

The first time I bought polenta in a tube I was leery to say the least. It’s weird. It doesn’t look appetizing. And good food usually doesn’t come in a tube of any kind. BUT. Polenta is one of those weird foods that you cook and then as it cools it will form whatever shape you happen to put it in. The tubes of polenta generally are minimally processed with no extra ingredients. It’s such a wonderful convenience, especially if you are wanting to fry it up like this. Simply take it out of the tube, slice it up and bake it (or you can pan fry it instead). It’s delicious and soooo easy.

To easily get the seeds out of your pomegranate, score around the center (don’t cut all the way through), pull the two halves apart, turn one half over in your palm and beat on it with a wooden spoon. In about 10-15 seconds, you will have a bowl full of pomegranate seeds. Try not to hit your hand with the spoon. For you visual types, check out this video if you don’t believe me or need to see it before attempting. If you like pomegranates, this will change your life. Seriously.

basilvinaigrettesalad3

Salad with Fresh Basil Vinaigrette and Roasted Polenta

6-8 cups salad greens (I used 1/2 leaf lettuce and 1/2 spinach)
1-2 cups sliced purple cabbage
2 ripe pears, seeded & sliced
1/2 pomegranate
1/2 cup feta cheese
1/2 cup walnuts (I lightly toast mine in a skillet but it’s optional)

For the dressing:
3 tbsp. red wine vinegar
1 tsp. dijon mustard
2 tbsp. olive oil
1/4 cup fresh basil, sliced into thin ribbons or chopped
Salt & pepper

1 tube prepared polenta

Preheat oven to 400˚. Slice polenta in rounds about 1/4 inch thick and spread out on a cookie sheet. Very lightly drizzle with olive oil and sprinkle with salt & pepper. Bake 20-30 minutes until a lightly browned and a bit crispy on the edges. They will still be tender and chewy in the middle.

Polenta "croutons", disks, rounds...whatever you call them, they are crispy, chewy, wonderful good!

Polenta “croutons”, disks, rounds…whatever you call them, they are crispy, chewy, wonderful good!

In a large salad bowl, combine greens, cabbage, pears and pomegranate.

In a small bowl whisk together dijon, vinegar, salt and pepper. While continuing to whisk, add olive oil very slowly, just a tiny drizzle. Stir in basil, taste and adjust seasonings if needed.

Whisk, whisk, whisk to get a dressing that stays together!

Whisk, whisk, whisk!

Add feta, walnuts and dressing to salad bowl and toss gently to combine. Serve with polenta rounds.

If you're going to eat salad, you should definitely eat this one!

If you’re going to eat salad, why not eat this one?

Tagged , , , , , , , , , , , ,

Chili Roasted Pineapple Fries

Some recipes are barely recipes.  They are more about me needing something to go with something, and well, I have this pineapple…

This dish defies any predetermined meal placement.  I served this with a side of BBQ chicken, but it would be just as good with a scoop of ice cream for dessert, or alongside a couple of scrambled eggs for breakfast.

One of my favorite Mexican restaurants is this little place in my home town, run by a Mexican lady who is always singing.  Last time I ate there, she gave me a couple of little tins of spices that she’s planning to start selling. I scored ground cinnamon and this wonderful ground chipotle pepper.  I’ve been putting it on everything!  You may think peppers and pineapples don’t go together, but you’d be wrong!  The kick from the peppers and the sticky sweet touch of honey is the perfect combo.

Chili Roasted Pineapple

Chili Roasted Pineapple

Chili Roasted Pineapple Fries

Fresh Pineapple
Honey
Ground chipotle pepper (or any ground chili/red pepper powder)

Preheat oven to 400˚. Slice pineapple up into whatever shapes you like.  Cover a baking sheet with foil and spray with cooking spray. Lightly brush tops of pineapple with honey and sprinkle with ground chili pepper.

Cut into whatever shapes you like.  I prefer little stick shapes.  When I cook these on the grill, I do big sticks, the height of the whole pineapple.  Or you can do skewers of chunks if you prefer.

Cut into whatever shapes you like. I prefer little stick (french fry) shapes. 

Roast for 10-15 minutes, until just starting to turn brown. If you prefer grilling to roasting, these are perfect on the grill!

Tagged , , , , , , ,

Apple Pomegranate Slaw

I am loving Fall this year!  Well, I love Fall every year.  The pretty colors, the crisp mornings, and yes, even the rain.  I like it.  So sue me.

The other thing I love about Fall is the produce that comes into season.  Honeycrisp apples (my favorite of all the apples) and pomegranates!  When those ugly red bundles of joy hit the shelves my heart goes pitter pat.  Yes, they are a bit of a pain to pick apart.  Yes, they stain your fingers.  I don’t care, they are wonderful!  And they are really good for you!  Eat them, eat them now!

I made up this recipe on the fly the other day when I needed a quick side dish.  And can I just say, YUM!  This is easily one of my favorite cole slaw variations to date.

Apple Pomegranate Slaw

Apple Pomegranate Slaw

Apple Pomegranate Slaw

1 cup purple cabbage, shredded or chopped
2-3 cups green cabbage, shredded or chopped
1/2 pomegranate (seeds only)
1 apple (I used Honeycrisp but any kind will work), shredded
2-3 tbsp. olive oil
2-3 tbsp. mayonnaise
1/2 tsp. sugar
1/2 tsp. yellow or dijon mustard
2 tbsp. lemon juice
Salt & pepper

Combine all ingredients.  Serve immediately.

Tagged , , , , , , , ,

Shark Tale

Most people who have eaten at my table know that while I love to cook, I don’t really get into fancy presentation.  If it looks good and tastes good, that is enough for me.  You can keep your radish roses and curlicues and edible flowers.

But every once in a while, a special occasion calls for a little extra effort.  This is where I usually find a fun project that I’ve been dying to try and give it a go.  Recently for my aunt’s birthday, my mom threw her a luau-themed party.  Now, I’m not Hawaiian (note pasty pale skin and no dance moves), so I’m guessing this is not part of any authentic luau menu, but I thought the occasion called for a shark.

I like carving things.  At Halloween I’m the first to dive into the pumpkins (even before I had kids).  In art school I did all sorts of damage to myself carving linoleum blocks for printing.  Getting creative with carving is just plain fun.  And so…when I saw a photo of a watermelon shark, I knew it was going to happen at some point.

I know this looks fancy, but in reality, it was pretty easy to pull off!  You don’t have to be a master carver by any means. Give it a try and impress all your friends.

Shark!

Shark!

Watermelon Shark with Fruit Salad

Watermelon – go for longer oval shape rather than round
Pineapple
Grapes
Blueberry or chocolate chip

Slice off a small wedge at one end at an angle, so when you sit it on the flat part it leans a bit to one side.  Save the wedge – you’ll use it to cut a piece for the fin later.

Cut a big V shape out for the mouth.  One edge of the V is almost straight up, the other at a low angle – chomp!

Dig out all the watermelon flesh.  I did this by cutting around the inside edge and then slicing and scooping with a big spoon.  Then use the spoon or knife to scrape close to the sides (not all that different from cleaning a pumpkin but quite a bit easier).  It doesn’t have to be perfect, but it’s nice to get all the edible stuff out so it can be eaten.  If you have loads of time, you can use a melon baller to do this, but I went more down and dirty and just hacked it all into bite sized chunks.  Set those aside.

Now you should have a watermelon shell with a big mouth cut in it and a hole in the bottom.  Good job!  Now take a small, sharp knife and score around the mouth about a half-inch or so from the edge all the way around.  Using the knife, cut away ONLY the green skin, leaving the white rind exposed.

Go slowly and slice off only the green outer layer.  If you score your outer line first it's easy to get a nice clean edge.

Go slowly and slice off only the green outer layer. If you score your outer line first it’s easy to get a nice clean edge.

Cut teeth out of the rind.  Very scary!

Close up of teeth carving.

Close up of teeth carving.

Carve a little diamond shape for the eye, inserting a blueberry or chocolate chip for the eyeball.  Cut a fin shape out of a piece of the rind you cut off.  I cut a little hole in the back of the shark and inserted it there so it would stay put.  Or you could use toothpicks to hold it in place if you prefer.

And here's your empty shark vessel.  Fill with fruit salad and wow all your friends!

And here’s your empty shark vessel. Fill with fruit salad and wow all your friends!

Chop up pineapple and de-stem grapes. Toss with the watermelon chunks and fill your shark.  Surround shark with fruit salad on the plate for a pretty presentation and you’re good to go!  You did it!


Tagged , , , , , ,

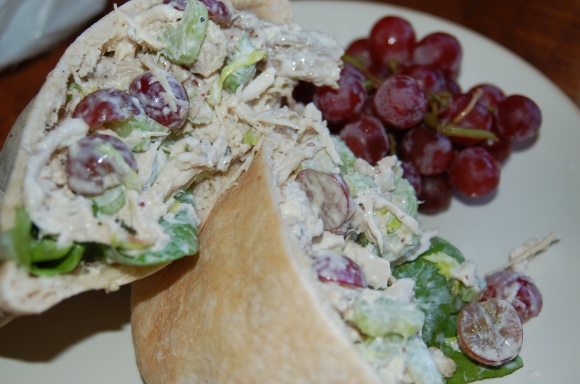
Fresh & Crunchy Chicken Salad

I like chicken salad.  I especially like it when it’s got some fruit and crunch.  I make this often when I have leftover chicken or turkey.  Now you could use canned chicken for this, but call me crazy, I prefer actual chicken.  It’s cheaper, and it tastes better, and it’s not loaded with extra sodium and preservatives.  Not much of a contest there.  If I don’t have leftovers from the night before, I usually buy a rotisserie chicken.  In a taste test with a can, the bird is going to win every time.

Fresh & Crunchy Chicken Salad in Pitas

Fresh & Crunchy Chicken Salad in Pitas

Fresh & Crunchy Chicken Salad

2-3 cups shredded chicken (or turkey)
2-3 stalks celery, sliced
1 cup grapes, halved
1/2 cup walnuts, chopped (optional)
1/2 -1 cup mayonnaise
1 tbsp. dijon mustard
1 tsp. red wine vinegar
Salt & pepper

Shred chicken, and add chopped celery, grapes and walnuts to bowl.

Lots of good stuff to keep it interesting.

Lots of good stuff to keep it interesting.

Add mayo, starting with 1/2 cup.  You can add more if you like it more creamy.  I just like to add enough where everything is moistened but not too mayonnaisy.  Add other ingredients and mix well.  Adjust seasonings and add more mayo if needed.

Serve in pitas or on a bed of greens.  Or if you want to get fancy you can fill a half pepper or tomato with it.  Or just eat it with a fork.

Tagged , , , , , , ,

Roasted Beet and Pear Salad

I have been absolutely loving farmer’s market this year!  This week I bought red and golden beets, blueberries, pears and goat cheese.  Since I couldn’t decide what to eat first, I decided to throw it all together into a yummy salad, perfect for a warm summer evening.

My first big bunch of basil was ready to harvest so I whipped up a batch of pesto this week.  It made the perfect vinaigrette to complement a summery salad. Along with the goat cheese and walnuts, it balances the flavors and keeps it all from being too sweet.

Roasted Beet and Pear Salad

Roasted Beet and Pear Salad

Roasted Beet and Pear Salad

*Note: adjust the quantities of the ingredients for your own tastes.  I used one pear and 2-3 beets for each salad.

Beets – red or golden or a mixture of both
Pears, peeled and sliced
Blueberries
Walnuts
Goat cheese

Preheat oven to 400˚.  Scrub beets and place on a roasting pan.  Roast for 30 minutes or until fork tender (this will depend on the size of your beets, check them after 20).  Peel and slice beets.  Layer beets and pears.  Sprinkle blueberries, walnuts and goat cheese over the top of the salad.  Serve with pesto vinaigrette (see below).

Pesto Vinaigrette:

1 tbsp. basil pesto
2 tbsp. minced red onion
2-3 tbsp. red wine vinegar
2-3 tbsp. olive oil
Salt & pepper

Whisk together all ingredients.

Pesto Vinaigrette.  Drizzle over the top of the salad (or on anything!) or serve on the side.

Pesto Vinaigrette. Drizzle over the top of the salad (or on anything!) or serve on the side.

Tagged , , , , , , , , ,