Monthly Archives: October 2013

Roasted Pumpkin Seeds, Part 2

As always, Halloween speaks to me in craftiness, crunchy snacks, and way too many tiny candy bars.  To offset at least a few candy bars, I always have a big bowl of crunchy roasted pumpkin seeds handy.

This year I tried a few different crafty things with pumpkins, including painting, decoupage, and of course a little carving.  If you don’t carve you don’t get seeds!  See, this is one area where efforts are always rewarded.

My crafty little pumpkins.  So cute!

Getting jiggy with the pumpkins.

I like to experiment with different seasonings for my seeds.  This year I opted for Indian spices.  I just found a blend of tandori seasonings that I really wanted to try out and it worked great on this!  But you can really use whatever seasoning blend or combination of seasonings you like best.  Even a simple coating of sea salt is perfect.  Get fancy with it or keep it as basic as you like.

Crunchy, pumpkiny goodness!

Crunchy, pumpkiny goodness!

Indian Spiced Pumpkin Seeds

Seeds from at least one pumpkin
Drizzle of olive oil
1 tsp. tandori spice mix
1 tsp. kosher salt
1/2 tsp. dried coriander

Wash your seeds and drain on paper towels.  For crispier seeds, you can let these dry overnight on a sheet of wax paper (don’t dry on paper towels, they tend to stick to it as they dry).  If you don’t mind them a tiny bit chewy, you can skip this step, or cook them a bit longer until they are as crispy as you like.

Toss seeds with a bit of olive oil and seasonings.  Spread out on a lined baking sheet that has been sprayed with cooking spray.  Bake at 400 degrees for 15-20 minutes until lightly brown and crispy.

To see how I did them last year, click here for Roasted Pumpkin Seeds, part 1!

Tagged , , , , ,

Cornbread Jalapeño Poppers

I know you’ve been searching for that perfect thing to share with the gang while you watch football.  Or to eat all by yourself while you watch football.  Or while you watch Grey’s Anatomy.  Whatever floats your boat.  In any case, quality snackage is a priority!

I saw a similar recipe to this on Pinterest and added a few of my own touches.  They were easy to make, and soooo delicious!  If you don’t like it spicy, you probably won’t like these.  They definitely have a kick!  If you like the idea but not the heat, you could also use baby sweet peppers, or do a combo if you are making them for a group.

If you’re using jalapenos, I would definitely recommend wearing gloves during preparation.  Otherwise, you may find yourself with stinging fingers for a bit.  I’ve often said I thought they should sell these in the produce department, right next to the peppers.  Alas, “they” don’t listen to me.  I found mine at the pharmacy.

Cornbread Jalapeno Poppers.  So good!

Cornbread Jalapeño Poppers. So good!

Cornbread Jalapeño Poppers

12 (or however many you want) jalapenos
1 box cornbread mix (I use Jiffy, but any will work)
Milk & eggs needed for mix (for Jiffy this is one egg and 1/3 cup of milk)
1 tbsp. honey
1 cup corn kernels
3-4 ounces cream cheese

Heat oven to 400 degrees.  Line a baking sheet with foil and spray with cooking spray.  Slice each jalapeno down the middle length-wise.

Slice the jalapenos.  I highly recommend wearing gloves.

Slice the jalapenos. I highly recommend wearing gloves.

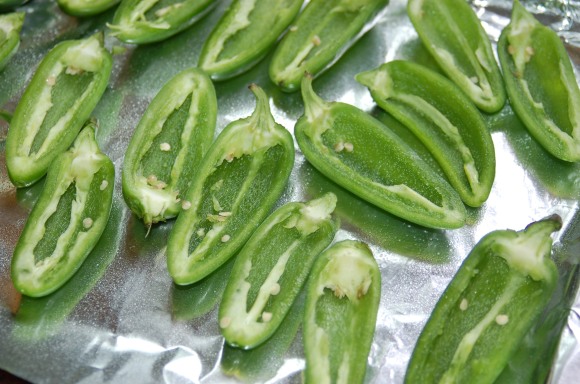
Clean out the seeds and membranes.  As you can see, I’m not a perfectionist when it comes to this part.  I leave the stems on because it makes a nice little handle.

Little jalapeno boats.  They don't have to be perfect.

Little jalapeno boats. They don’t have to be perfect.

Smear the inside of each pepper with cream cheese.  You can use a spoon or knife, but I found it was easier to use my fingers.  Just grab a little bit and smoosh it in there.

This little touch definitely stepped up the yummy factor.  Mmmm!

This little touch definitely stepped up the yummy factor. Mmmm!

Mix up cornbread mixture according to package instructions.  Add honey and corn and stir to combine.  Put a little cornbread mixture in each pepper half.  Don’t overfill or it will spill out all over as it cooks.  I had a few that were more cornbread blob with jalapeno in there somewhere (still delicious but not as pretty).  I had a little leftover cornbread mix, so I made a few mini muffins for the non-pepper lovers.

Don't go crazy with the filling if you want attractive poppers.

Don’t go crazy with the filling if you want attractive poppers.

Bake for 15 minutes or so, until lightly browned on the top.

If you have any left in the morning, they make dandy scrambled eggs.  Simply chop up and scramble with a couple of eggs in a hot skillet.

Good morning to me!

Good morning to me!

Tagged , , , , , , , , ,

Tossed Caprese Salad

It’s nice to have a salad once in a while that doesn’t involve lettuce.  When you eat salad often (which I try to do) sometimes you just can’t look at another lettuce leaf.  There is just something about this simple salad that reminds me of summer.  And truthfully, summer is my favorite time to make it, with vine-ripened tomatoes and basil from the garden.  But I make it year round, because I love these flavors together so much.  And even in winter the cherry or grape tomatoes taste sweet and juicy. Do yourself a favor and spring for the fresh mozzarella for this one.  The taste and texture are completely different from the rubbery stuff and well worth the extra buck or two.

So toss this one together, kick back, and think sweet thoughts of summer days.

Tossed Caprese Salad

Tossed Caprese Salad

Tossed Caprese Salad

2 cups cherry or grape tomatoes, halved (I usually leave the tomatoes out at room temperature for maximum flavor)
1/2 cup basil leaves, torn or sliced in ribbons
1 cup fresh mozzarella, cubed
1-2 tbsp. balsamic vinegar
1 tbsp extra version olive oil
Salt & fresh ground pepper

Toss together all ingredients until the oil and vinegar coat the cheese and tomatoes somewhat evenly.  Serve at room temperature.

Tagged , , , , , ,

Flourless Chocolate Zucchini Brownies

In my quest to use up a massive amount of zucchini given to me this summer I came across this gem of a recipe.

I have to say when it comes to baked goods, I’ve never been the biggest fan of the gluten-free, no flour, no sugar, no butter (no good stuff!) variety.  While there are some good recipes out there, most of them just can’t hold a candle to the real thing…in my humble opinion.  Now if you’re on a special diet and you have to go there, I understand but otherwise?  Why bother?  This recipe is worth bothering.  It’s every bit as good as something that has the sugar, butter and flour.  The fact that one of these brownies is just a fraction of the calories of a regular one AND are gluten-free just makes them easier to justify.  But the real reason to make them is because they are delicious!  And if you ask me, that’s the main reason for making dessert to begin with, am I right?

The original recipe only called for 1/2 cup of chocolate chips, and you can use that amount if you want.  I am a chocolate fanatic so I doubled it, and used the big bittersweet ones.  Fabulous!

Fudgy, delicious, and good for you?  Yep!

Fudgy, delicious, and good for you? Yep!

Flourless Chocolate Zucchini Brownies
(slightly adapted from ambitiouskitchen.com)

1/2 cup all natural unsalted peanut butter
1/4 cup honey
1/2 cup unsweetened natural applesauce
1 teaspoon vanilla
1/2 cup unsweetened cocoa powder
3/4 cup oats
1 teaspoon baking soda
1/4 teaspoon salt
1 1/2 cups shredded zucchini
1 cup dark chocolate chips, divided

Preheat oven to 350 degrees. Spray 8×11 baking pan (or an ultimate brownie pan!) with nonstick cooking spray.

Place oats in blender or food processor and process until finely ground. Don’t worry, it doesn’t need to be perfect but it should take a few minutes. Mine still had some whole oats and pieces mixed in with the ground stuff.  Worked fine.  Set aside.

In a large bowl of electric mixer, cream together peanut butter, applesauce, honey and vanilla until smooth. Add in zucchini, cocoa powder, ground oats, baking soda, and salt; mix until well combined. Gently fold in 1/2 cup of chocolate chips. Pour batter into prepared baking pan and sprinkle remaining chocolate chips over the top. Bake for 25-30 minutes or until tooth pick inserted into middle comes out almost clean.

Cool brownies on wire rack then cut into squares. Yum!

Cooling brownies.  I used my ultimate brownie pan (gift from my dear sister) so all my brownies have edges!  The edges are my favorite part.

Cooling brownies. I used my ultimate brownie pan (gift from my dear sister) so all my brownies have edges! The edges are my favorite part.

Tagged , , , , , , , ,

Apple Pomegranate Slaw

I am loving Fall this year!  Well, I love Fall every year.  The pretty colors, the crisp mornings, and yes, even the rain.  I like it.  So sue me.

The other thing I love about Fall is the produce that comes into season.  Honeycrisp apples (my favorite of all the apples) and pomegranates!  When those ugly red bundles of joy hit the shelves my heart goes pitter pat.  Yes, they are a bit of a pain to pick apart.  Yes, they stain your fingers.  I don’t care, they are wonderful!  And they are really good for you!  Eat them, eat them now!

I made up this recipe on the fly the other day when I needed a quick side dish.  And can I just say, YUM!  This is easily one of my favorite cole slaw variations to date.

Apple Pomegranate Slaw

Apple Pomegranate Slaw

Apple Pomegranate Slaw

1 cup purple cabbage, shredded or chopped
2-3 cups green cabbage, shredded or chopped
1/2 pomegranate (seeds only)
1 apple (I used Honeycrisp but any kind will work), shredded
2-3 tbsp. olive oil
2-3 tbsp. mayonnaise
1/2 tsp. sugar
1/2 tsp. yellow or dijon mustard
2 tbsp. lemon juice
Salt & pepper

Combine all ingredients.  Serve immediately.

Tagged , , , , , , , ,

Brown Sugar Chili Rubbed Salmon with Avocado Crema

The photos had me drooling.  I spotted this on one of my favorite blogs and I had to make it.  Immediately.  And let me tell you, it was amazing. And to top it off, it is one of those recipes that is easy enough to make on any weeknight, but fancy enough for special guests too.

You have to make this.

Sweet with a tiny touch of spice, cooled with a creamy avocado sauce.  The little tang of lime.  Perfection.  I’m told it’s not bad form at all to lick the crema bowl (good thing!).

If you only try one new salmon recipe this year, make it this one.  Easily in my top 10!

Tastes as delicious as it looks!

Could it possibly taste as delicious as it looks?  Absolutely!

Brown Sugar Chili Rubbed Salmon with Avocado Crema
(from canyoustayfordinner.com)

For the crema:
1/2 avocado, peeled and pitted
2 tbsp. sour cream
2 tbsp. fresh lime juice
1/4 cup fresh parsley (optional, I didn’t have any so I left it out)
1 garlic clove
1/4 tsp. salt.

For the salmon:
2 tbsp. brown sugar
1 tbsp. chili powder
1/2 tsp. salt
Pinch cayenne pepper
4 – 5oz. salmon filets
2 tbsp. olive oil
1 lime, sliced into rounds (at least 4 slices)
In a blender or food processor, combine crema ingredients and blend until smooth.  If you want the sauce thinner, you can add a bit of water to thin it (I didn’t).
In a small bowl combine brown sugar, chili powder, salt and cayenne.  Sprinkle over fish and rub into all sides of the filets.
In a large skillet, heat 1 tablespoon of the oil over medium high heat. Add 2 of the salmon filets (skin-side-up if they have skin on) and cook, undisturbed, until the underside is crisp and just beginning to blacken, about 4 minutes. Flip the filets and cook an additional 4 minutes, until the fish feels firm to the touch. Remove to a plate immediately. Add the remaining tablespoon of oil to the pan and swirl to coat. Add the remaining 2 filets of salmon and repeat the cooking process. Once all of the salmon is cooked and transferred to a plate, add the lime slices to the now-empty pan and cook just until they begin to caramelize, about 30 seconds. Flip and cook for an additional 30 seconds.
To serve, top filets with a generous dollop of crema and press a caramelized lime into the top of each filet.
Tagged , , , , , , ,