Category Archives: Uncategorized

Berry Beety Salad

Nothing says summer to me as much as blackberries.When I was a kid I would stuff my face with as much as I could find, and wore the scratches and stains with pride. Here in Oregon, it seems they are always growing everywhere, along sides of roads, in fields, in random bunches here and there, in most people’s yards. We are going to have a bumper crop in our backyard this year. I don’t know anyone who actually planted their blackberries, but everyone seems to have some. Although whatever variety of berries in my yard isn’t quite ripe yet (we counted 5 black ones today, but the rest are still green or red), farmer’s market was bursting with them. I picked up some Marion berries (a local variety of blackberry) that tasted just like sunshine.

In my farm box this week there were greens, greens and more greens. I still have some lettuce from last week too, so I’ve committed to eating some sort of lettuce based meal every day this week in hopes of using it all up. Last night I roasted beets (also in my box this week, yay!), made a simple but lovely blackberry vinaigrette and ended up with this beautiful and delicious salad. When salads taste like this it is far from a hardship to eat them every day.

Beets, berries, goat cheese, oh my!

Beets, berries, goat cheese, oh my!

Berry Beety Salad

2-3 cups leaf lettuce
1/2 cup blackberries plus a few for dressing
3-4 beets
1-2 oz. goat cheese
1 tbsp. balsamic vinegar
1 tbsp. olive oil
1/2 tsp. dijon mustard
Salt & pepper

Heat oven to 400˚. Place beets on a baking sheet. Drizzle with a bit of olive oil. Bake for 30-40 minutes until a fork goes in easily when you stab them. Let cool. Peel if desired and cut into bite size pieces.

In a small bowl crush a few blackberries with a fork. Add balsamic vinegar, olive oil, dijon and salt & pepper. Whisk together to make dressing.

Pile lettuce on a plate. Top with beets and blackberries. Drizzle with dressing and top with goat cheese. Finish with a few grinds of black pepper. Serves 1-2. I ate all this myself, so multiply recipe accordingly.

Tagged , , , , , , ,

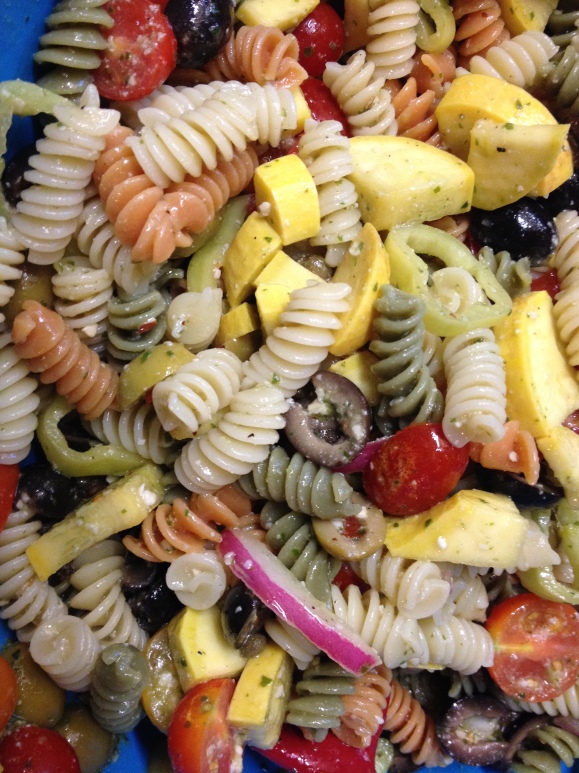
Marinated Veggie Pasta Salad

The potluck is big in my family. At every family gathering there is a tasty spread, sometimes more varied than others. There was the year of six potato salads. All very similar since we all use my grandma’s recipe with our own little twists. But that’s another story. While I love potato salad, I usually opt to bring something for potlucks that is a little more temperature friendly. Call me paranoid, but mayonnaise-based food sitting out in the sun or at room temperature for hours makes me nervous.

This pasta salad is the answer to all of your potluck questions (or what to eat for your midnight snack questions). It tastes great hot cold or in between. It can be made ahead. As the veggies and noodles marinate in the beautiful vinaigrette, they just improve with time. And you get to use up all the extra veggies in your fridge. There is no downside here. Make this. Make it today. Don’t wait for the next potluck. You will love having this in your fridge.

Marinated Veggie Pasta Salad

Marinated Veggie Pasta Salad

Marinated Veggie Pasta Salad

1 or 2 summer squash or zucchini, diced
1 cup cherry tomatoes, halved
1/4 cup sliced red onion
1/2 cup olives, halved
1 tbsp. capers
1-2 banana peppers or sweet peppers, sliced or diced
2 tbsp. pesto
2 tbsp. olive oil
2 tbsp. red wine vinegar
Salt & pepper
1/4 cup parmesan cheese
1 package rotini

In a large bowl combine pesto, olive oil, red wine vinegar and capers. Add salt & pepper to taste. Add all veggies, stir to coat and let sit for at least an hour.

The veggies. Marinate at least an hour for the most flavor.

The veggies. Marinate at least an hour for the most flavor.

Cook pasta until al dente. Rinse with cool water to stop cooking. Add to bowl with veggies and cheese, toss to combine. Check seasoning and adjust if necessary. Eat!

Tagged , , , , , , , , , , ,

Shark Tale

Most people who have eaten at my table know that while I love to cook, I don’t really get into fancy presentation.  If it looks good and tastes good, that is enough for me.  You can keep your radish roses and curlicues and edible flowers.

But every once in a while, a special occasion calls for a little extra effort.  This is where I usually find a fun project that I’ve been dying to try and give it a go.  Recently for my aunt’s birthday, my mom threw her a luau-themed party.  Now, I’m not Hawaiian (note pasty pale skin and no dance moves), so I’m guessing this is not part of any authentic luau menu, but I thought the occasion called for a shark.

I like carving things.  At Halloween I’m the first to dive into the pumpkins (even before I had kids).  In art school I did all sorts of damage to myself carving linoleum blocks for printing.  Getting creative with carving is just plain fun.  And so…when I saw a photo of a watermelon shark, I knew it was going to happen at some point.

I know this looks fancy, but in reality, it was pretty easy to pull off!  You don’t have to be a master carver by any means. Give it a try and impress all your friends.

Shark!

Shark!

Watermelon Shark with Fruit Salad

Watermelon – go for longer oval shape rather than round
Pineapple
Grapes
Blueberry or chocolate chip

Slice off a small wedge at one end at an angle, so when you sit it on the flat part it leans a bit to one side.  Save the wedge – you’ll use it to cut a piece for the fin later.

Cut a big V shape out for the mouth.  One edge of the V is almost straight up, the other at a low angle – chomp!

Dig out all the watermelon flesh.  I did this by cutting around the inside edge and then slicing and scooping with a big spoon.  Then use the spoon or knife to scrape close to the sides (not all that different from cleaning a pumpkin but quite a bit easier).  It doesn’t have to be perfect, but it’s nice to get all the edible stuff out so it can be eaten.  If you have loads of time, you can use a melon baller to do this, but I went more down and dirty and just hacked it all into bite sized chunks.  Set those aside.

Now you should have a watermelon shell with a big mouth cut in it and a hole in the bottom.  Good job!  Now take a small, sharp knife and score around the mouth about a half-inch or so from the edge all the way around.  Using the knife, cut away ONLY the green skin, leaving the white rind exposed.

Go slowly and slice off only the green outer layer.  If you score your outer line first it's easy to get a nice clean edge.

Go slowly and slice off only the green outer layer. If you score your outer line first it’s easy to get a nice clean edge.

Cut teeth out of the rind.  Very scary!

Close up of teeth carving.

Close up of teeth carving.

Carve a little diamond shape for the eye, inserting a blueberry or chocolate chip for the eyeball.  Cut a fin shape out of a piece of the rind you cut off.  I cut a little hole in the back of the shark and inserted it there so it would stay put.  Or you could use toothpicks to hold it in place if you prefer.

And here's your empty shark vessel.  Fill with fruit salad and wow all your friends!

And here’s your empty shark vessel. Fill with fruit salad and wow all your friends!

Chop up pineapple and de-stem grapes. Toss with the watermelon chunks and fill your shark.  Surround shark with fruit salad on the plate for a pretty presentation and you’re good to go!  You did it!


Tagged , , , , , ,

Peanut Butter Granola Bars

In my search for healthier snacks that aren’t rabbit food, I came across a simple recipe for granola bars.  This is what I would call a “guideline” recipe.  Take the basics here and add and subtract stuff you like.

I did two batches of these.  In one batch I was a little more generous with the peanut butter, and I added some extra peanuts and dried cranberries.  In the other batch I used chocolate peanut butter in place of the regular stuff, and added mini chocolate chips.  When I cut the bars I did have some crumbling, which resulted in some bars and some loose granola that was perfect for tossing on top of oatmeal or yogurt.  Adding a little oil to the recipe would probably help with the crumbling, but I was shooting for healthy here so I didn’t bother with it.

Homemade granola bars, two different ways.

Homemade granola bars, two different ways.

Peanut Butter Granola Bars

2 cups rolled oats
1/2 cup unsalted peanuts, chopped
1/2 cup peanut butter (I used natural PB with no sugar, I also did one batch with natural chocolate peanut butter – they make that!)
1/4 cup honey

Other mix-ins such as dried fruit, nuts or chocolate chips!

Preheat oven to 350˚.  Melt peanut butter in microwave or on the stove.  Combine all ingredients in a bowl and mix well, using your hands if necessary.  Add a little more honey or a drizzle of oil if it seems too dry.  Spray a pan with cooking spray and press mixture into the pan firmly.  Bake for 10-15 minutes (bake a little longer if you like them really crunchy).  Let cool a bit and cut into bars or crumble for loose granola.

Which one to eat first? Decisions, decisions...

Which one to eat first? Decisions, decisions…

Tagged , , , , , , , ,

Italian Chicken Soup

It’s that time of year again where the sniffles reign supreme.  In my house, the first hint of a cold calls for chicken soup.  But who wants the same kind every time?  I like to mix it up.  This Italian version has a similar character to minestrone.  Rich and flavorful, it is sure to cure what ails you.  And if it doesn’t, well, it still tastes good, so eat up!

Italian Chicken Soup

Italian Chicken Soup

1 onion, chopped
3 stalks celery, sliced
4 cloves garlic, minced
1 pound chicken thighs or breasts, cut into bite sized pieces
1 bay leaf
1/4 tsp. crushed red pepper flakes
1 cup sliced carrots
6 cups chicken broth
2 tsp. Italian seasoning
2 cans diced tomatoes with juice
1 can cannellini beans (rinsed and drained)
2 cups fresh green beans, trimmed and cut into bite sized pieces
2/3 cup dry orzo
Salt & pepper to taste

Saute onions, celery, carrots and garlic in a drizzle of olive oil for a few minutes.  Add chicken and continue to cook and stir until chicken is no longer pink.  Add bay leaf, crushed red pepper, chicken broth, Italian seasoning, and tomatoes.  Bring to a boil and reduce heat to medium low. Keep at a simmer for 30 minutes.  Add cannellini beans and green beans.  Bring back to a low boil.  Add orzo and stir.  Cook another 20 minutes or so until pasta is done and green beans are tender.  Taste and add salt & pepper as needed.  I also like to spike mine with a little hot sauce at the end just for an extra kick.

Roasted Pumpkin Seeds!

As Halloween approaches my little household usually indulges in some fall craftiness.  Some pumpkin painting…

And some pumpkin carving…

Boo!

Which leads me to the really fun part of pumpkin carving.  No I don’t mean plunging your hands into the oooey gooey pumpkin guts.  I mean cooking and eating the yummy pumpkin seeds!    You can season these with just about whatever strikes your fancy.  I prefer something with a little kick.  Some time ago I came across a seasoning salt called “Jamaica Me Crazy!”  This spicy mix was the perfect combo for my seeds this year.  If you don’t happen to have that, any seasoning blend would work fine, or make your own.  I often combine salt, pepper, chili powder and garlic powder.  Or lemon pepper, dill and salt.  Or curry, salt and sugar.  You get the idea.  Let your taste buds guide you.

Yummy, toasty goodness.

Remove the seeds from the pumpkin and rinse them in a colander to remove most of the pumpkin gunk.

Contemplating their toasty fate.

Pat dry with paper towels and spread on a lined cookie sheet.  Toss with seasonings.

Ready to pop in the oven.

Bake at 400˚ for about 20 minutes, stirring once somewhere in the middle, until seeds are crunchy and starting to brown.  Munch on them while they are hot, warm or cold.  Keep leftovers in a sealed container or ziplock bag to maintain freshness.

Tagged , , , , ,

Make Like A Rabbit

One day my kids went to visit a friend who is a vegetarian.  When they came back they reported that she was doing great, but that she was eating a “bowl of weeds.”  Upon further investigation I found out what she was eating was kale.  And really, I couldn’t argue in kale’s favor.

I’ve never been a big fan of your leafy green things.  I love salad, and have embraced the spinach (especially the baby variety) but collard greens, mustard greens, kale, etc. leave me baffled.  I don’t really know what to do with them, and truthfully, I’ve never really liked them.  When I have had them, they have been cooked to slimy lumps of science project green that leave me with no appetite.

BUT.

One of my goals in the last year has been to teach myself to like some new foods.  Foods that I have previously either disliked or really never eaten.  Especially foods that are really good for you. Like your dark leafy green things. Hello, Kale.

So I was watching a food documentary the other day, and Rip Esselstyn, author of the Engine 2 Diet, was showing some people a few recipes and one of them was a kale salad.  I was actually intrigued.  It looked good.  Kale looked good?  Yep.  So with this new revelation and very simple recipe in hand, I ran to the store and bought myself a wad of kale.

I will not say that kale will be on my menu every day from now on.  I didn’t looooooove it. But I liked this recipe.  It was simple, crisp and refreshing.  I ate this one day as my lunch and then again as a side dish with pasta the next day.  I’ve made my peace with kale and I have a feeling we’ll be meeting again soon, maybe even with a little heat involved.

Kale & Avocado Salad

Kale & Avocado Salad

1 small bunch of kale (I used dinosaur kale)
1 avocado
Juice of 1/2 lemon
Salt & pepper

Chop up the kale into small pieces.  Stop when you get down to the stem area unless you want to do some extra chewing; the stems are tough.  Put the chopped kale in a bowl.  Peel the avocado and scoop out the insides into the kale bowl.  Squeeze the lemon juice in with it.  Add some salt & pepper to taste.  Using your hands, mash the avocado and kale together like you were making a meatloaf.  The mashed avocado and lemon juice make a sort of salad dressing consistency that should coat all the greens.  Adjust the seasoning if needed and make like a rabbit.

This will make 2 main dish servings or 4 side dish servings.


Tagged , , , , , , , , ,

Vanishing Meatloaf

When I visited my sister and her family in Spain I cooked for them a few times.  One of the things my sister misses most about home while living in Europe is plain old American food.  So one night I made meatloaf.  It was a huge hit with the whole family.  About a month later, I got a call from her saying David, my brother-in-law, was craving meatloaf.  And mine was the one he wanted.  Who could blame him, it’s awesome!

I am a huge advocate of hiding vegetables in places you wouldn’t really expect them.  Meatloaf is one of my favorite veggie hiding spots.  Not only do the additional veggies contribute extra flavor and variety to what can be a pretty boring, albeit classic, dish, but they also add moisture, keeping it from being dry and lifeless.  That isn’t even touching on the extra health benefits from eating meatloaf that is secretly about 1/3 veggies.  I much prefer this to the traditional version and my kids can’t get enough of it.  For those of you who are not huge veggie fans, chop them small or grate them and you probably won’t even notice they are there.  Don’t expect any leftovers.

Don’t feel like you have to use the exact amounts listed here.  I only wrote it down so someone else could make it.  Truthfully, I don’t measure anything when I make it.  Because let’s face it, good meatloaf is just like good art:  sometimes you just throw things together and magic happens.

Vanishing meatloaf. So good!

Vanishing Meatloaf

2 pounds ground beef
1 cup chopped mushrooms
1/2 cup chopped onion
1/2 chopped red pepper
1/2 cup chopped fresh spinach
1/2 cup oatmeal
1/3 cup ketchup
A few shots of hot sauce
1 tbsp of Italian seasoning
1-2 cloves chopped garlic
Salt & pepper
1 egg
Pinch of crushed red pepper flakes

Preheat your oven to 375˚. Combine all ingredients in a bowl.  Your hands are the best tools to use for this job.  Wear gloves if you don’t like to get dirty.

Ready to get my hands dirty. I really should have used a bigger bowl.

Mix lightly with your hands until all ingredients are combined.  Spray your casserole dish with cooking spray, plop in the meatloaf mixture and lightly press into the shape of the pan.

Don’t feel like you have to mash this down. Just press it into the shape of the pan. I top it at this point with some more ketchup and hot sauce. Spread it together over the top for a tangy topper.

Top with additional ketchup and hot sauce and spread over the top. Bake uncovered for 45-60 min at 375. If there is extra grease or juice around the edges after cooking, just drain it off a bit before serving.  Get ready to watch it disappear!

Vanishing meatloaf. I had to hold off the hungry hoard to get this photo. You’re welcome.

I Won Something! Woot!

A few days ago, I was nominated for the Versatile Blogger Award!  Thanks to Ashley from instillari for the nomination.  I’ve been enjoying Ashley’s blog, and found that we have several things in common, including a love of sweet treats (I have to make that strawberry-cheesecakey-pretzel thing!) and Ralph Waldo Emerson.

Apparently if you are nominated for the award it’s the same as winning, so yay!  I can’t even remember the last time I won something.

This award comes with a few rules:

  • Thank the person who gave you the award and provide a link to their page on your blog
  • Nominate 15 blogs for the award and let them know by leaving them a comment
  • Copy/Paste the award on your blog post
  • Share 7 things about yourself

So…in keeping with the rules of this award, here are seven random things about myself that you may or may not know.

1. Although I like almost every genre of films, I have an embarrassing weakness for teenage coming of age movies.

2. I usually start planning my next meal before I’m even finished with the one I’m eating.

3. I started practicing for my old ladyhood when I learned to crochet when I was 8 or 9 years old.  But I’ve tried to knit many times with no success.

Giant granny square!  I made that!

4. I have 77 cousins (last time I counted them up).  I might have missed a few. They are constantly multiplying.

5. I have a girl cat named Fred.  She thinks water tastes better when there is a fish swimming in it.

Fred. And the ill-fated Timmy, who has since been replaced by Nelson the fish.

6. I take a photo of my feet in the ocean every time I go to the beach.  It reminds me that simple things make me happy.

Just a couple of weeks ago at the Oregon coast.

7. I’m afraid of heights but I like to climb trees.

And now I have all the power!  I get to nominate 15 blogs for the award I just received.  These are not in any particular order of fondness or anything.  You guys rock!  Keep ’em coming.

1. Meatballs & Milkshakes.  The name drew me in and I stayed for the food.  Wonderful, fun commentary and good visuals. Simple, delicious looking food.  Plus she loves lemon and olives so we could definitely dine together any day.

2. The Flog.  Felicia Day cracks me up.  I’ve been a fan ever since Dr. Horrible’s Sing-a-long Blog.  This is her at her geeky best, and the only video blog included here. My favorite episode so far is where she and Colin Fergusen learn to crochet.

3. Summer Tomato.  Scientist meets foodie.  Great insight and information about leading a healthy lifestyle and eating well.  I really enjoy her “for the love of food” posts, where every week she gives us a list of links to more info, studies, food facts and all sorts of fun tidbits.

4. Poor Girl Eats Well.  Great recipe blog with delicious food cooked on a tight budget.  Also good shopping tips, etc.

5.  Can You Stay For Dinner? Written by Andie, who has lost over 100 pounds and maintained it over the last few years, despite having a great love of food and chocolate.  Mouth-watering recipes, tips and some very thought provoking posts as well.

6. Linus & Bubba Books.  This blog is written by one of my numerous cousins mentioned above (the only one I am nominating here I might add).  Terrific book blog with well-written reviews, literary insights, funny banter and the occasional cute dog pic.

7. Learn 2 [use the] Kitchen.  Fun recipe blog.  Great beginner recipes but many anyone would enjoy, including me.  I like how she includes the antics of her boyfriend “the Ryan” and some of the challenges they face with some of their opposing dietary wishes.

8. BevCooks.  Just recently discovered but loving the creative recipes!

9. SabbyinSuburbia.  I just used Sabrina’s blog to create my own pendants and I LOVE them.  I have received so many compliments every time I wear one, which is almost all the time.  I can’t wait to try some more of her crafty ideas.

10. Foodimentary. Looking for something to celebrate?  Look no further.  John will give you a foodie holiday for just about every day, plus some fun facts to go with it.

11. Photonatureblog.  Gorgeous photos. ’nuff said.

12. Back Road Journal. Beautiful food, flowers, travel.  I love the photos and the recipes look wonderful.

13. Spoon fork bacon.  They had me at fried pickle chips.

14. A Cup of Jo.  Terrific photos, snippets of conversation, and a touch of poetry. Lovely.

15. The Drinking Girls.  I just starting reading the blog, but I’ve had their first cookbook for a while.  Wonderful recipes, including an incredible Spanish Tortilla, and cocktails too!

And there you have it, folks!  Thanks again for the award, and for reading this thing in the first place!!

Tagged , ,

Chicken Curry with Onion and Tomato

Every once in awhile you get a craving for a specific restaurant dish and wish you could make it at home.  I get a hankering like that for Indian food all the time.

Last night I made some Chicken Curry that tasted like I had ordered it and had it brought to my table, fresh from the hard-working hands of a team of real life Indian folks in the back kitchen.  And complete with a bill of $12.95 (each!) at the end of dinner.  Except mine costs less than that for the whole darn batch and I got to eat it  in my living room.

One of the great things about this particular curry is that, although it tastes very authentic, it doesn’t require any terribly unusual ingredients.  If you haven’t cooked Indian food before you may have to pick up one or two spices, but they can be found at the grocery store in most cases. And once you have them on hand, you have no excuse not to make Indian food any ole time you’re in the mood for it.

For all you veggie-haters out there (you know who you are), you’ll love this one because all of the veggies (except the mushrooms, which you can leave out) are pureed smooth, creating this yummy sauce.  You won’t even know they’re there.

Chicken Curry with Onion and Tomato

Chicken Curry with Onion and Tomato
(adapted from Indian Home Cooking, by Suvir Saran and Stephanie Lyness)

4 chicken thighs, cut into bite size pieces
3/4 tsp. turmeric
3/4 tsp. cayenne pepper
Salt
1 large onion, roughly diced
5 garlic cloves
A 2-inch piece of fresh ginger, peeled and cut into a few pieces
3 tbsp. canola oil
1 cinnamon stick (about a 2 inch piece)
12 green cardamom pods (find in the Asian section of the grocery store)
9 whole cloves
9 black peppercorns
2 large tomatoes, coarsely chopped
2 tbsp. tomato paste
1/4 cup plain yogurt
1/2 cup sliced mushrooms (optional)
1 cup water
1/2 cup chopped fresh cilantro
Juice of 1 lemon
Rice

To cook the rice, bring a pot of salted water to boil.  Add the rice you want (I use 1-2 cups for a batch) and boil for 8 minutes.  Drain the water, put a lid on it and set aside until you are ready to eat.  It will be perfect, with the grains separate, every time!

Combine the chicken, 1/2 tsp. of turmeric, 1/2 tsp. of cayenne and a pinch of salt in a bowl.  Stir to coat the chicken and set aside while you make the sauce.

In a food processor or blender, finely mince the onion, garlic and ginger.  Set aside.

Combine 2 tbsp. oil, the cinnamon, cardamom, cloves and peppercorns in a large skillet or dutch oven over medium-high heat.  Cook, stirring, until the cinnamon unfurls, 1-2 minutes.  Add the minced onion mixture and 1 tsp. salt.  Cook, stirring, until onion starts to brown around the edges, about 10 minutes.

Remove and discard cinnamon and stir in the remaining 1/4 tsp. turmeric and 1/4 tsp. cayenne.  Add the tomatoes and tomato paste and cook, stirring, about 5 minutes.  Transfer to a food processor or blender and puree until smooth.  Set aside.

Heat the remaining 1 tbsp. oil in the same pan over medium-high heat.  Add the chicken and cook, stirring, 2 minutes.  Add the yogurt, 1 tbsp. at a time and stir well after each addition.  Cook, stirring, for 2 more minutes.  Add the mushrooms and stir to combine.

Add the pureed tomato mixture and bring to a boil.  Stir in the water.  Return to a boil, then reduce the heat and simmer, partially covered, until the chicken is cooked through, 20-30 minutes.  Stir occasionally to keep it from sticking to the bottom of the pan.  Then uncover and cook a few minutes more to reduce and thicken the sauce.  Stir in cilantro and lemon juice.  Taste for salt and serve hot over rice.  Serves 4.


Tagged , , , , , ,