Monthly Archives: November 2013

Spinach-Feta Omelet with Pine Nuts

I’ve given up buying cereal.  Whenever I do, we each have a bowl and then watch it sit on the shelf thereafter, slowing going stale.  Suffice it to say none of us are big fans of the stuff, in spite of the occasional craving.  I feel better and less hungry throughout the day when I have a bit of protein in the morning instead.

This delicious omelet makes a perfect breakfast or lunch.  The pine nuts add a nutty touch that works beautifully with the spinach.  Add them near the end of sauteing the veggies, since they burn easily.

Spinach-Feta Omelet with Pine Nuts

Spinach-Feta Omelet with Pine Nuts

Spinach-Feta Omelet with Pine Nuts

1/4 cup onion, finely chopped
3/4 cup baby spinach, coarsely chopped
1 tsp pine nuts
2-3 tbsp. feta cheese
2-3 eggs
Salt & pepper

Beat eggs with a pinch of salt & pepper and set aside.

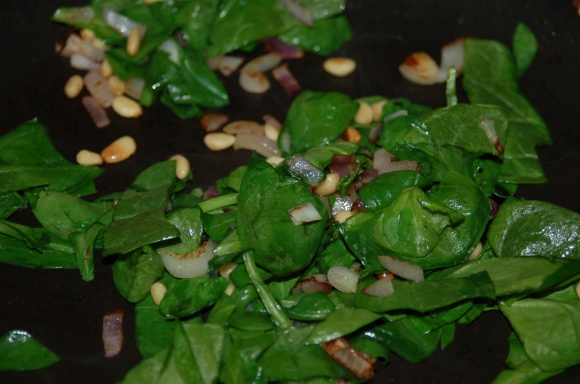
Heat a medium skillet (I prefer a 10″ skillet for omelets) over medium heat.  Add a drizzle of olive oil and rub around skillet to coat entirely.  Add onion and sauté 2-3 minutes, until tender.  Add spinach and pine nuts.  Cook, stirring frequently another minute or two, until spinach is slightly wilted.  Remove veggies to a plate.

Cooking the veggies.  I only cook until the spinach is just barely cooked.

Keep an eye on the veggies so your pine nuts don’t burn!

Add eggs to the skillet.  Swirl around to coat the bottom of the pan.  Using a spatula, push or lift the edges of the egg, tilting the pan so the runny egg fills the empty spot.  Keep doing this until there is no runny egg.  You will end up with a bumpy, moon crater surface of an omelet, with the egg mostly cooked but still glossy on top.

Scatter cheese all over the surface, and then put the veggies just on one half.

Yum!

Yum!

Cook a minute until cheese starts to melt, fold omelet over, slide out of the pan and serve immediately.

Tagged , , , , ,

Roasted Cauliflower Cheddar Soup

I am always on the lookout for new soups, especially in the fall/winter time.  I make soup at least once a week, sometimes more.  This is one of my favorites I’ve discovered so far this year.

Roasted cauliflower is a staple side dish in our house.  I cook it just like french fries, spread out on a baking sheet and drizzled with olive oil.  This soup takes it a few steps further, turning those lovely roasted bites into a creamy, cheesy, delicious soup.  I loved the earthy flavor of the cauliflower combined with the slight bite of sharp white cheddar.  So good!

Roasted Cauliflower Cheddar Soup

Roasted Cauliflower Cheddar Soup

Roasted Cauliflower Cheddar Soup
(adapted from cookingclassy.com)

1 large head of cauliflower, chopped into bite size pieces
1 1/2 tbsp. olive oil
Salt & pepper
3 tbsp. butter
1 onion, finely chopped
3 tbsp. flour
1 clove garlic, minced
5-6 cups chicken broth
1 cup heavy cream
1 tbsp. chopped parsley, plus extra to garnish
1 tsp. fresh thyme leaves
1 bay leaf
1 cup shredded white cheddar cheese
1/4 cup shredded parmesan
Finely chopped red pepper or green onions for garnish (optional)

Preheat oven to 425 degrees. Place cauliflower on baking sheet, drizzle with olive oil and toss to evenly coat, then spread out evenly on the pan. Season lightly with salt and pepper. Bake 20 – 25 minutes. Remove from oven and set aside.

Roasting cauliflower.  I do this all the time as a side dish.

Roasting cauliflower. I do this all the time as a side dish.

In a soup pot or Dutch oven, melt butter over medium heat. Add onion and sauté until tender, about 4 – 5 minutes. Add in flour and cook, stirring constantly 1-2 minutes, adding in garlic during last 30 seconds of cooking. While whisking, slowly pour in chicken broth and cream. Add in parsley, thyme, bay leaf, a pinch of salt & pepper, and roasted cauliflower.  Bring to a boil, stirring frequently and allow to cook until thickened slightly. Using a stick blender (my tool of choice here), or a blender or potato masher, puree part or all of soup.  I like to leave a few chunks for texture but if you like it smooth, go for it.  Remove from heat and stir in sharp white cheddar and parmesan cheese. Garnish with finely chopped red pepper and/or parsley, if desired.  Serves 4 as a main dish.

Tagged , , , , , ,

Herb-Roasted Root Veggies

I’ve been LOVING the fall veggies this year.  That means much experimenting with cooking and combining them in different ways with awesome results!  This is a simple mixture of roasted root veggies that you can mix and match however you’d like.  I used beets, white sweet potatoes and carrots, but if you like something else better (or don’t like some that I used), any root vegetables would work great in this.  I do this all the time with regular potatoes or just carrots, but this is definitely a nice twist.  The sweeter veggies actually caramelize as they cook, making this a sweet and savory treat indeed.  My kids gobbled up huge piles of these.  If you’re looking for an interesting but easy side dish for Thanksgiving, look no further.  These are as gorgeous to look at as they are delicious.

Herb-Roasted Root Veggies.  As beautiful as they are delicious!

Herb-Roasted Root Veggies. As beautiful as they are delicious!

Herb-Roasted Root Veggies

1 large white sweet potato
2 large beets
6 large carrots
Olive oil
Fresh herbs (I used rosemary, thyme and sage), chopped
Salt & pepper

Heat oven to 400˚.  Peel vegetables and chop into similar size pieces (about the size of a french fry).  Lay out on a baking sheet and drizzle with olive oil.  Scatter herbs on top, add a dash of kosher salt and a few grinds of pepper.  Toss about with your fingers and spread out evenly.

All ready to roast.  Minimal tossing will prevent the beets from turning everything pink.

All ready to roast. Minimal tossing will prevent the beets from turning everything pink.

Roast for 30-40 minutes, stirring once about halfway through.  Veggies are done when they are tender and starting to brown on the edges.  Serves 4.

Tagged , , , , , , ,

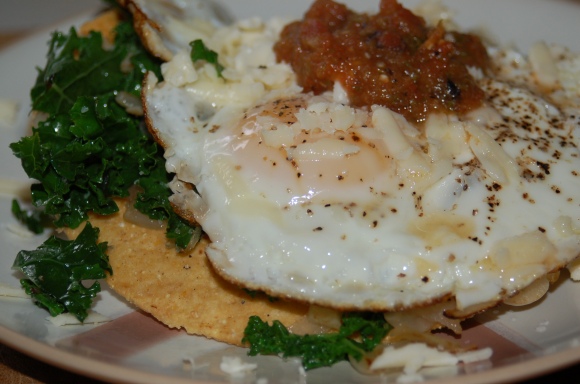
Kale Over Easy Tostada

After my Halloween debauchery, I decided to detox from all the sugar with a three day juice fast.  I drank four fresh vegetable/fruit juices per day, and ate a light vegetarian dinner each day.  I think it did the trick.  After a splitting headache for two days, I felt much better and stopped craving sugar.  While the juices were delicious, by the time my fast was done I was juiced out.  But still had a lot of juicing veggies left.

While I normally eat a lot of vegetables, kale and chard are not among my favorites, so I’m trying to find creative ways to use them up.  I really liked how this tostada turned out.  The onions and garlic add so much flavor to the kale, and a quick sauté brightens the taste and softens the texture.  With the yolky egg on top, it was a great combo.  I might actually buy kale to make this again.

Kale Over Easy Tostada

Kale Over Easy Tostada

Kale Over Easy Tostada

For each tostada:
1 tostada shell
2-3 kale leaves, coarsely chopped (discard stems)
1/4 cup chopped onion
1 clove garlic, minced
1-2 eggs
1 oz. shredded cheese (I used white cheddar)
Salsa (optional)
Salt & pepper

Heat a drizzle of olive oil in a medium skillet.  Add onion and sauté 2-3 minutes.  Add garlic and kale and cook another 2 minutes,  until kale is slightly wilted and onions are translucent.

Just cook until kale is wilted but still bright.  You don't want to cook it to death.

Just cook until kale is wilted but still bright. You don’t want to cook it to death.

If desired, heat tostada shell for a few seconds in microwave (just so it isn’t cold), and top with kale mixture.  Break eggs into the same skillet, sprinkle with salt & pepper and cook until they are done as much as you like.  I like mine over easy, which means cook just until the whites are set (not clear), then flip or cover to cook the other side briefly, removing them while the yolk is still runny. Place eggs on top of kale.

Top with cheese and salsa and enjoy!

Tagged , , , , ,

Hearty Red Potato Fritatta

When you hear fritatta your mind might automatically head for breakfast-land.  But this also makes a dandy lunch or dinner, served with a side of fruit or salad.  This week it landed in brunch territory, alongside three cups of tea and a pile of Honeycrisp apple slices.

I often use leftover baked potatoes for this one, but if you don’t have any, a quick spin in the microwave will do just fine.

Hearty Red Potato Fritatta

Hearty Red Potato Fritatta

Hearty Red Potato Fritatta

2 red potatoes
1/4 cup onion
1/4 cup red pepper
2-3 strips bacon
1 cup fresh spinach, coarsely chopped
5 eggs
Salt & pepper
1/2 cup white cheddar cheese, shredded

If you aren’t using leftover baked potatoes, poke all over with a fork and stick in the microwave.  About 4-5 minutes on high should have them fork tender.  Remove and dice.

In a small bowl, beat egg with a pinch of salt & pepper and set aside.

In a medium skillet (I like to use a 10″ skillet for these), cook bacon until crisp.  Remove to paper towels to drain and dispose of all but a tablespoon or two of the bacon grease.  Add onion and pepper to the pan and sauté a couple of minutes until tender.  Add potatoes and a pinch of salt & pepper.  Stir to combine.  Add spinach and stir into the mixture.  Make sure veggie and potato mixture is evenly distributed in the pan.  Pour egg mixture over the top.  Sprinkle with cheese.  Turn heat down to medium low and cover.  Cook another 5-10 minutes until top is completely set.  Slice into wedges and enjoy!

Tagged , , , , ,

Roasted Beet Spaghetti

Today I have a bit of an unusual dish (at least for me, in my corner of the world).  Psychedelic, hot pink pasta.  I came across this recipe on Pinterest and just couldn’t resist giving it a try.  The recipe was in Polish, but with the help of a translator (thank you modern technology!) and a little creative wrangling and interpretation, I think I got the gist of it.

I am a big fan of roasted beets, particularly this time of year.  Beets are one of those things you either love or hate.  There doesn’t seem to be much middle ground here.  So if you are a beet-hater, just ignore this post.  You probably won’t like it.  I promise to post something sans beet later in the week.  My daughter, Claire, is a beet-hater.  I’ve been working on her, but so far I’ve met with no success in this area.  She didn’t care for this.  Her reason?  It tasted like beets.  Well, duh.  This is why my cupboard is always stocked with peanut butter.  Luke and I, on the other hand, loved it.  The roasted beets are mellowed with yogurt and the zing of goat cheese and lemon perfectly balances the earthy flavor of the beets.

One note:  some dishes are wonderful left over the next day.  In my opinion, this is not one of them.  I did not enjoy this nearly as much as leftovers as I did when it was freshly made.  I’m not sure why, but there you have it.  Enjoy it fresh if at all possible for best results!

Roasted Beet Spaghetti

Roasted Beet Spaghetti

Roasted Beet Spaghetti
(adapted from eintopf)

12 oz. spaghetti
4 medium beets
2 tbsp. olive oil
1 cup greek yogurt
Zest and juice from one lemon
2 cloves garlic, minced
1/2 onion, chopped
A few basil leaves, chopped
Salt & pepper
Goat cheese (optional)
Lemon wedges for garnish

Heat oven to 400 degrees.  Poke beets a few times with a fork and lay on a baking sheet.  Drizzle with olive oil and roast for 30-40 minutes, or until fork tender.  Remove from oven, let cool slightly and peel.

While beets are cooling, cook spaghetti.  Drain, reserving a bit of the cooking water.

In a food processor combine beets, olive oil, lemon juice, onion and garlic.  Process until finely chopped, nearly smooth.  Add yogurt, lemon zest and basil leaves.  Process until smooth.  Toss mixture with hot pasta.  Add a couple tablespoons of the pasta water if needed to coat the noodles smoothly.  Add salt & pepper to taste.  Top with crumbled goat cheese (if desired), fresh basil and serve with lemon wedges.

Roasted Beet Spaghetti, without goat cheese.

Roasted Beet Spaghetti, without goat cheese.

Tagged , , , , ,

Citrus-Herb Roasted Chicken

When I was a kid, every once in a while we’d pick up a bucket of chicken for dinner.  This was a real treat.  I liked the chicken and LOVED the mashed potatoes that always accompanied it.  I’m not such a fan anymore.  It’s been this way for a number of years, ever since that fateful day as a teen when I dived into the bucket for my favorite piece – the drumstick – and came away with a drumstick…and a gnarly, extra crispy chicken foot still attached.  Yikes.

These days, I would probably be less squeamish about the foot, but more so about the quality of the food and the unhealthy way it’s cooked at most fast food places.  Besides, I always felt shorted on the drumstick front.  A whole bucket of chicken and most of it not what I wanted.  It makes so much more sense to cook it myself.  I like to buy the “family pack” of chicken legs and cook that whole sucker up all at once.  It usually makes enough for 2-3 meals for my little family, or it’s great if you’re feeding a crowd.

This is an easy recipe and it turned out so pretty!  I recommend marinating the chicken for a few hours (or all day) but you don’t have to if you don’t have time.  I wanted the texture to be similar to a roasted chicken so I packed them all together in a roasting dish.  For quicker cook times and more crispy chicken, you can lay them out on a baking sheet instead.  But this made for a pretty presentation and the chicken was melt-in-your-mouth tender.

Citrus-Herb Roasted Chicken.  So yummy!

Citrus-Herb Roasted Chicken. So yummy!

Citrus-Herb Roasted Chicken
(slightly adapted from thecomfortofcooking.com)

1/4 cup olive oil
4 cloves of garlic, minced
2 tablespoons sugar
2 whole lemons, one juiced and zested, and one sliced
2 whole oranges, one juiced and zested, and one sliced
1 tablespoon Italian seasoning
1/2 teaspoon paprika
1/4 teaspoon crushed red pepper flakes
Kosher salt and freshly ground pepper, to taste
12-20 pieces chicken drumsticks (and/or thighs)
1 medium red onion, thinly sliced
1 teaspoon dried or fresh thyme
1 tablespoon dried or fresh rosemary

Preheat oven to 400 degrees.

In a small bowl whisk together olive oil, garlic, sugar, lemon juice and zest, orange juice and zest, Italian seasoning, paprika, red pepper flakes, and a pinch of salt and pepper.  Add marinade to a large plastic bag or baking dish (I prefer to use a plastic bag for marinated since it’s easy to rotate and get the marinade on all the parts equally.  I set the bag inside a baking dish just in case it leaks).

Place chicken in a large casserole dish.  Since my pan was the deeper sort, I placed my chicken so the small ends were down in the bottom and the larger ends poked up (think chicken leg bouquet). Place parts skin side up and spread them out evenly in the pan. Pour marinade all over chicken, turning pieces to coat all sides. Arrange slices of lemon, orange and onion around and under the chicken. Sprinkle all over generously with thyme, rosemary, salt and pepper.

All ready to pop in the oven.

All ready to pop in the oven.

Bake uncovered for about 1 hour – hour & 15 minutes, or until chicken is cooked and juices run clear. (If you use breasts for this recipe, the cooking time should only be around 40 minutes). Remove to a serving platter and garnish with additional chopped fresh herbs, if desired.

Tagged , , , , , , , , , ,

Tomato Quiche Cups

I love quickie breakfasts.  Even more, I love quickie breakfasts that are delicious.  Baked eggs are an easy and very tasty way to start the day.  Ever since I bought my ramekins, these have been coming out of my oven on a regular basis.  What I really love about them is that there are so many variations!  Whatever your imagination (and refrigerator) can dream up will most likely turn into a tasty breakfast.

Sometimes I just break the eggs into the cups on top of the veggies and meat.  But I was in the mood for something a bit fluffier so I added a little cream and beat it into the eggs for a more quiche-like texture.  The result?  Fluffy, light and oh so good!

Pretty and so good!

So pretty and so good!

Tomato Quiche Cups

For each cup:

1plum tomato, diced
1 oz. hard salami, cut into matchsticks or small cubes (1-2 tbsp)
2 slices brie cheese
2 eggs
1 tbsp. heavy cream
Salt & pepper

Preheat oven to 375 degrees.  Spray your ramekins with cooking spray.  Place tomatoes and salami in the bottom.

Tomato & salami.  Feel free to sub bacon or pepperoni, or leave out for a vegetarian version.

Tomato & salami. Feel free to sub bacon or pepperoni, or leave out for a vegetarian version.

Top with brie.

Top with brie.  Feel free to use a different cheese if you prefer (or no cheese).

Top with brie. Feel free to use a different cheese if you prefer (or no cheese).

Whisk together eggs, cream and a pinch of salt & pepper.  Pour over veggies and cheese.

All ready to go in the oven.  Be sure to make on a baking sheet, just in case they spill over just a bit as they cook.

All ready to go in the oven. Be sure to make on a baking sheet, just in case they spill over just a bit as they cook.

Place ramekins on a baking sheet (sometimes they poof up so much you get a little overflow so this is a good idea).  Bake 15-20 minutes until eggs are set.  The quiche will be poofed up when you first take it out.

Let sit for a couple of minutes.  The eggs will settle as it cools, looking more like this:

Deflated a bit after cooling a few minutes.  Dig in!

Deflated a bit after cooling a few minutes. Dig in!

Tagged , , , , , , , , , , ,