Monthly Archives: May 2013

Zingy Purple Potato Salad

One of the things I love best about farmer’s markets are finding things you don’t ever see in the grocery store.  This week I found bright purple potatoes!

Aren't they pretty?  I'm told they are called Purple Vikings

Aren’t they pretty? I’m told they are called Purple Vikings.

Now, I thought these were just too pretty to waste on something normal.  Some time ago I came across an idea for a lighter potato salad that used greek yogurt and lemon so I decided to incorporate those flavors with my lovely potatoes.  Roasting the potatoes added another dimension with a firmer texture and deeper flavor.  You can make this more or less lemony depending on how much zing you want.  As much as we love traditional potato salad, this fresh and summery take on an old favorite was a real winner at my house!

Zingy Purple Potato Salad.  Perfect for summer!

Zingy Purple Potato Salad. Perfect for summer!

Zingy Purple Potato Salad
(adapted from bevcooks.com)

2 pounds purple potatoes, cut into bite size pieces
1 tbsp. olive oil for roasting
Salt & pepper
2-3 stalks celery, finely chopped
2 tbsp. olive oil
3 tbsp. greek yogurt
2 tbsp. lemon juice
1 tsp. lemon zest
1 tbsp. fresh dill (or 1 tsp. dried)
1 tsp. fresh mint, finely chopped

Preheat oven to 400˚.  Toss potatoes with 1 tbsp. olive oil and spread out on a baking sheet. Sprinkle with salt & pepper. Roast for 30 minutes or until tender and browned, stirring halfway through.

Zingy Dressing

Normally I would just eat them like this.

In a large bowl whisk together 2 tbsp. olive oil, greek yogurt, lemon juice, zest, and dill.

Zingy dressing!

Zingy dressing!

Add potatoes and celery to bowl.  Toss to combine with dressing.  Season with salt & pepper to taste.  Sprinkle fresh mint over the top.

Mmmmm!  You need some of this.

Mmmmm! You need some of this.

Tagged , , , , , , , , ,

BBQ Pork Shepherd’s Pie

In my arsenal of meals that appear well thought out and taste delicious, yet require almost no effort, Shepherd’s Pie reigns supreme.  The added benefit is it uses up leftover odds and ends.  In this case, more leftover shredded pork from a roast I cooked a couple of weeks ago that had been stuck in the freezer.

I wasn’t really in the mood for traditional shepherd’s pie.  I was actually in the mood for BBQ.  So I thought, why not make a BBQ shepherd’s pie?  And so I did.  In consideration of my über-lazy mood, I used a can of baked beans rather than mixing up my own, which made this come together in a snap.  Rave reviews from the troops quickly ensued.

BBQ Pork Shepherd's Pie

BBQ Pork Shepherd’s Pie

BBQ Pork Shepherd’s Pie

2-3 cups shredded pork (see below for my basic pork roast recipe)
3/4 (give or take) cup barbecue sauce
1 can baked beans (I used Bush’s country style)
3/4 cup pineapple
3-4 russet or red potatoes
3 tbsp. butter (2 for the mashed potatoes and 1 to dot on top)
1/4 cup milk
Salt & pepper
1/4 cup sliced green onions or chives for garnish

Peel and quarter potatoes.  Boil until fork tender.  Mash with butter and milk.  Season to taste with salt & pepper.  Set aside.  Preheat oven to 375˚.

Heat pork in the microwave for a couple of minutes and then combine with barbecue sauce.  Spread in the bottom of a casserole dish.

Layer #1.  Shredded BBQ pork.

Layer #1. Shredded BBQ pork.

Top with pineapple.

Layer #2: Fresh pineapple!

Layer #2: Fresh pineapple!

Spread baked beans over the top.

Layer #3: Baked beans

Layer #3: Baked beans

Spread mashed potatoes over the top.  Dot with butter and sprinkle with green onions.

Layer #4: Mashed Potatoes.  Potatoes make everything even better, don't they?

Layer #4: Mashed Potatoes. Potatoes make everything even better, don’t they?

Bake at 375˚ for 30 minutes, until heated through and lightly browned on top.  Serve with corn on the cob on the side for a complete BBQ dinner in one bowl!

And there you have it.  My BBQ creation.

And there you have it. My BBQ creation.

Basic Pork Roast

Pork Butt or Shoulder Roast
1 onion, sliced or diced
2 cloves garlic
1 8 oz. can diced green chiles
Salt & pepper

Rinse pork roast and place fat side up in a dutch oven.  Sprinkle with salt & pepper, top with onion, chopped garlic and green chiles.  Put a lid on and roast at 350˚ for 3-4 hours, until tender and falling apart.  Pull apart with two forks to shred.

Alternatively you can do this in the crock pot (mine was too big this time, so I did it in the oven instead).  When I cook it in the crock pot, I turn it on high for the first hour, then down to low to cook the rest of the day.

Ready to pop into the oven or crock pot.

Tagged , , , , , , , , , ,

Greek Yogurt Soufflé

I have no intention of giving up dessert.  That being said, I am trying to eat healthier (most days anyway).  So I occasionally attempt a lighter dessert in my efforts to be good.  Sometimes you get pretty much what you’d expect.  Something okay.  Something less.  Less satisfying.  Less tasty.  Less what you were craving.

But sometimes you get a surprise.  A tasty, wonderful surprise.  That something “lighter” is still delicious and crave-worthy.  It stands on its own as a dessert and yells “EAT ME!”

These little beauties pass the dessert test in my book.  I love cheesecake but it’s about one of the most evil desserts on the planet.  These soufflés taste like a fluffy, delicate cheesecake cloud and are absolutely delightful.  And at about 140 calories each (vs. 500-800 calories for a slice of cheesecake), you don’t even have to feel guilty about it.

For the most impressive presentation serve immediately, as soon as they come out of the oven.  They start to fall as they cool but no worries!  Even if they do, they are mouth-watering.  You can also eat them the next day, although don’t be alarmed if they are about half their original size.

Greek Yogurt Soufflé

Greek Yogurt Soufflé

Greek Yogurt Soufflé
(from julesfood.blogspot.com)

1 cup greek yogurt (original plain)
3 eggs, separated
3 tbsp. flour
1/8 tsp. salt
1 tsp. vanilla extract
1/8 tsp. cream of tartar
1/4 cup sugar
a little butter and sugar for prepping the ramekins
Berries and/or lemon zest for garnish

Preheat your oven to 375˚.  Rub the inside of each of 6 ramekins with a very light coating of butter.  Sprinkle some sugar in there and swirl it around to coat the surface.  Dump out any excess sugar.  Place prepared ramekins on a baking sheet.

In a large mixing bowl whisk together yogurt, egg yolks, flour, salt and vanilla.  Set aside.  In another bowl, beat the egg whites and cream of tartar until foamy.  Gradually add the sugar and continue to whisk or beat until soft peaks form.

This is about what they looked like right before I mixed them together.

This is about what they looked like right before I mixed them together.

Add 1/3 of the egg white mixture to the yogurt mixture and incorporate well.  Add in another 1/3 of the mixture and carefully fold it in, then do the last of the mixture.  You don’t want to mix too much, just fold until incorporated; you want to retain as much volume as possible.

Divide among your ramekins, filling about to the line (at least on the ones I have).

I use 8 oz. ramekins and this is how full they were.  A 6 oz. ramekin would probably work fine as well.

I use 8 oz. ramekins and this is how full they were. A 6 oz. ramekin would probably work fine as well.

Bake for 15 minutes.  Do not open the door to peek!  They should be lightly browned and puffed up nicely.  Remove from oven, garnish and serve immediately for the full effect!  They will begin dropping as they cool.  No worries, they will still be delicious, but not quite as impressive after they’ve fallen.

Just out of the oven.  Serve right away!

Just out of the oven. Serve right away!

Already starting to fall a bit after about 10 minutes, but still sooo good.

Already starting to fall a bit after about 10 minutes, but still sooo good.


Tagged , , , , , , , , ,

Grilled PBBJ (did she just say bacon?). Best. Sandwich. Ever.

Sometimes amid the open-fridge staring, when your mind is blank and you can’t figure out what to make, inspiration strikes.

An old favorite, a farmer’s market find, and a cupboard staple meet in what could possibly be the best sandwich ever created.  I don’t say this lightly, because there are a lot of good sandwiches out there.  But this…it was perfection.  Make it.  Make it today.  Don’t worry if it sounds weird.  It’s not.  It’s meant to be.  It’s your destiny.

I'll bet you never found this in your lunch sack when you were a kid.

I’ll bet you never found this in your lunch sack when you were a kid.

Grilled PBBJ (Peanut Butter, BACON! & Jam) Sandwich

2 slices of decent bread
1-2 tbsp. crunchy peanut butter (I like the natural kind)
2-3 slices bacon
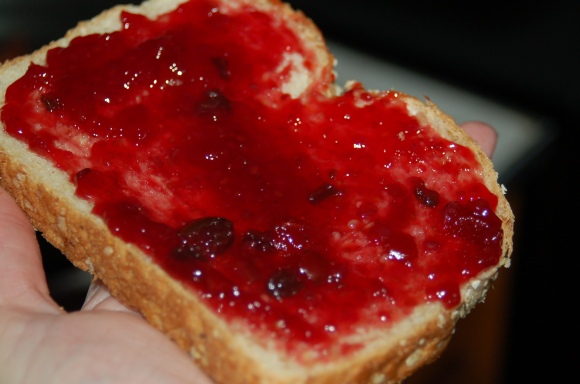
1 tbsp. jam (I used raspberry pepper jam)
1 tsp. butter

For the best results, use great ingredients.  Natural peanut butter, homemade (by someone) jam, good bread.  Real butter.  I scored some truly amazing jam at farmers market, raspberry pepper jam!  Use your favorite.

Good ingredients = good sandwich.  These are my faves.

Good ingredients = good sandwich. These are my faves.

Cook bacon until crisp, drain on paper towels.  If you’re using the same skillet (and why wouldn’t you), wipe out all the bacon grease before proceeding.

Heat skillet over medium heat.  Lightly spread a bit of butter on one side of the bread slices.  On the other side of one slice spread a liberal coating of peanut butter.  If there is a way to do this without getting butter on yourself, I haven’t found it.  Resign yourself to getting dirty.  Place butter side down in the pan.  Top with bacon.

That's what I'm talking about.

That’s what I’m talking about.

On the other side of the other piece of bread, spread jam.

My new favorite jam.  I love farmer's market.

My new favorite jam. I love farmer’s market.

Place jam side down, butter side up on top of the bacon.  Cook for 1-2 minutes on each side until golden brown and crispy.  Cut in triangles and eat!

Tagged , , , , , , , , ,

Shredded Pork Huevos Tostada

I’ve lost track of how many versions of huevos rancheros I’ve posted, but I just don’t think you can have too many options and I never seem to make it the same way twice.  This version used leftover pork roast (will it ever run out?) and eggs cooked over easy.  Very simple and oh, so delicious!

The packages of tostadas I’ve been buying have 36 tostadas in them.  I don’t know how many of these things you eat in a sitting, but I’ve had to get pretty creative with tostadas for breakfast, lunch and dinner in order to use them all before they go stale.  Not that I’m complaining.  I like tostadas.  But still, don’t hate me for the flood of tostada recipes.  I’m working with what I’ve got!

Shredded Pork Huevos Tostada

Shredded Pork Huevos Tostada

Shredded Pork Huevos Tostada

Tostada shell or tortilla (1-2 per person)
Pork roast (about 1/2 cup per tostada – see below for basic pork roast recipe)
1-2 eggs per person
Cheddar cheese
Sliced Avocado
Salsa

Heat a large skillet over medium heat.  Add a drizzle of olive oil.  Break one or two eggs into the pan.  Add some pork roast on the side.  If you are cooking these for more than one person, you can do these in two separate pans, with the eggs cooking in one and the pork heating up in the other (or heat the pork in the microwave if you prefer).

I just cook everything in the same pan, but you can do them separately if you want.

I just cook everything in the same pan, but you can do them separately if you want.

Cook eggs a couple of minutes until nearly set and then flip and cook briefly on the other side until it’s done to your liking.  Build your tostada starting with pork.  Follow with eggs, a sprinkle of cheese, avocado and salsa.

Basic Pork Roast

Pork Butt or Shoulder Roast
1 onion, sliced or diced
2 cloves garlic
1 8 oz. can diced green chiles
Salt & pepper

Rinse pork roast and place fat side up in a dutch oven.  Sprinkle with salt & pepper, top with onion, chopped garlic and green chiles.  Put a lid on and roast at 350˚ for 3-4 hours, until tender and falling apart.  Pull apart with two forks to shred.

Alternatively you can do this in the crock pot (mine was too big this time, so I did it in the oven instead).  When I cook it in the crock pot, I turn it on high for the first hour, then down to low to cook the rest of the day.

Ready to pop into the oven or crock pot.

Ready to pop into the oven or crock pot.

Tagged , , , , , , ,

Shredded Pork Tostada “Salad”

Another entry in my “what to do with that giant pork roast” series, these started out as tostadas but I piled so many veggies on top that it ended up being more of a salad in my opinion.  Whatever it was, it was delicious.  Feel free to sub veggies you like for those you don’t.  Instead of salad dressing, we just used a liberal drizzle of salsa over the whole thing.  Wonderful.  And pretty too!

Shredded Pork Tostada "Salad"

Shredded Pork Tostada “Salad”

Shredded Pork Tostada “Salad”

Crunchy tostadas (I used 2 per person)
1-2 cups shredded pork (see below for the basic pork roast recipe)
Cheddar cheese
Mixed salad greens
Tomatoes, diced
Avocado, sliced or diced
Black olives, sliced
Salsa

If your pork roast is not hot, heat it up in the microwave or toss in a skillet for a few minutes to heat.  Since I typically use leftovers to make these that is what I did.

Top with cheese and pile on the other toppings to suit your tastes.  Drizzle salsa over the whole thing and eat!

Basic Pork Roast

Pork Butt or Shoulder Roast
1 onion, sliced or diced
2 cloves garlic
1 8 oz. can diced green chiles
Salt & pepper

Rinse pork roast and place fat side up in a dutch oven.  Sprinkle with salt & pepper, top with onion, chopped garlic and green chiles.  Put a lid on and roast at 350˚ for 3-4 hours, until tender and falling apart.  Pull apart with two forks to shred.

Alternatively you can do this in the crock pot (mine was too big this time, so I did it in the oven instead).  When I cook it in the crock pot, I turn it on high for the first hour, then down to low to cook the rest of the day.

Ready to pop into the oven or crock pot.

Ready to pop into the oven or crock pot.

Tagged , , , , , , , ,

Asparagus and Shiitake Omelet

With farmer’s markets up and running for the season, as well as my favorite local fruit and veggie supplier, I have more produce than I usually know what to do with.  Everything looks so beautiful that I buy with my eyes instead of following my shopping list.  The wonderful bounty can turn into a trash can full of waste if I’m not careful.  So what I usually do to avoid this is lay everything out when I get home from shopping and plan meals around what I bought.  Large fruits like pineapples and melons get peeled and chopped and put away in the fridge for easy snacking for the kiddos (and me).  Other things get cooked for dinner, with the most perishable things getting used first.  And any leftovers most likely will find their way into my breakfast.

I found the most wonderful tiny shiitake mushrooms at the market this week.  My daughter commented on how delicious they were and how different they taste compared to other mushrooms.  She’s right! Combined with some leftover roasted asparagus, I had the makings for a tasty treat of an omelet.

Asparagus and Shiitake Omelet

Asparagus and Shiitake Omelet

Asparagus and Shiitake Omelet

4 stalks of asparagus, cut into one inch pieces
1/2 cup shiitake mushrooms, sliced
1/4 cup red onion, chopped
1/4 cup shredded parmesan cheese
2-3 eggs
Salt & pepper

In a small bowl beat the eggs with a pinch of salt & pepper.  Set aside.  Heat a skillet over medium heat.  Add a drizzle of olive oil and toss in your onion and mushrooms.  Saute for a couple of minutes until veggies are tender.  Add asparagus and cook another minute or two (since my asparagus was already cooked I just added it at the end and tossed it until it was heated through).  Remove veggies to a bowl and set aside.

Add another drizzle of olive oil to the pan and swirl it around to coat the surface.  Pour eggs into the pan.  Move them around with your spatula, lifting the edges and tilting the pan to move the uncooked egg to the pan surface.  You’ll end up with a lumpy moon crater surface, with all of the egg mostly cooked but still a little glossy on top.  This is how you avoid omelets that are runny in the middle or overcooked on the outside!

asparagusshiitakeomelet

Sprinkle cheese all over the egg surface.  Pile all of the veggies on one half.  If needed let it cook a few seconds until the egg is set and the cheese is melted.

Doesn't that look yummy?

Doesn’t that look yummy?

Fold over and slide onto a plate.  Enjoy!


Tagged , , , , , , , ,

Steak with Shiitake Sherry Sauce

We don’t eat much red meat these days, so when we have steak it’s a real treat!  I scored some beautiful shiitake mushrooms at farmer’s market this weekend and they paired perfectly with my little hunk of cow. I’ve also made this sauce to spoon over pork chops or chicken.  But the steak was mmmm…plate-licking good.

With the opening of farmer’s market this weekend I had LOTS of veggies on hand so we made this a low carb affair with lightly roasted asparagus and cauliflower “fries”.  Yum!

Steak with Shiitake Sherry Sauce

Steak with Shiitake Sherry Sauce

Steak with Shiitake Sherry Sauce

2 steaks (whatever kind you like best will work fine)
Salt & pepper
1 tbsp. olive oil
1 cup shiitake mushrooms, halved or sliced
1/4 cup sherry
1 tbsp. butter, cut into pieces

Make sure steaks are dry so you get a good sear.  Sprinkle with salt & pepper and set aside.  Heat a skillet over medium-high heat.  Add olive oil and let it get hot (if you flick a few drops of water in the pan it should sizzle if it’s ready).  For medium-rare, cook steaks 3-4 minutes per side (or to the doneness you prefer).  Remove from pan and let them rest while make the sauce.

Add mushrooms and sherry to the pan.  Sauté 2-3 minutes.  Add a few grinds of pepper.  Remove pan from heat and whisk in the butter.  Slice steaks across the grain and spoon sauce and mushrooms over the top.

Tagged , , , , , , , , , , ,

Thai Chicken Lettuce Wraps

In my efforts to eat healthy some days are more successful than others.  This meal was probably the healthiest one I made all week, and definitely one of the tastiest as well.  It was a huge hit with the kids too.

If you don’t like it spicy, you will want to reduce or eliminate the Thai or serrano peppers.  Made according to the recipe, these definitely have a bit of a kick!

One note on ground chicken:  I typically don’t like to buy it.  For some reason it seems to always have a bit of a mysterious gritty texture that I don’t enjoy.  Unless you are close friends with the guy at the meat counter, there is no way to know exactly what is ground up in there.  Instead I buy chicken thighs and grind them up myself in my food processor.  A few pulses is all it takes.  It results in a coarser, juicier texture which I like, and no weird grit!  Plus you have the advantage of choosing exactly what parts of the chicken you want to eat.  I usually opt for thighs since I find them a bit more flavorful. That being said, if you’re in a hurry or just don’t want to mess with it, by all means buy ground chicken instead.

Not a fan of lettuce wraps?  Admittedly they are a little messy but I love them.  However, once you’ve made this mixture there is no reason you couldn’t put it in a wrap, tortilla, rice paper, pepper half or pita pocket.  Or just dig in with a fork.  Whatever conveyance you choose, these are just plain yummy!

Thai Chicken Lettuce Wraps.  Delicious!

Thai Chicken Lettuce Wraps. Delicious!

Thai Chicken Lettuce Wraps
(adapted from Cooking Light)

4 tsp. canola oil, divided
1/2 cup minced shallots
1/2 cup (or more) thinly sliced red bell pepper
4-5 cloves garlic, minced
1 pound chicken thighs (or ground chicken)
2 Thai or serrano chiles, minced (less if you don’t like it spicy)
1 tbsp. fish sauce
2 tsp. brown sugar
2 tsp. soy sauce
1/4 tsp. black pepper
1 cup basil leaves, coarsely chopped or torn
1 tbsp. lime juice
Lime wedges
Large lettuce leaves (I like to use butter lettuce for this since the leaves are sort of bowl-shaped)

Cut chicken into chunks and add to a food processor.

Making ground chicken.  I prefer this to buying ground chicken.  It only takes a few extra minutes!

Making ground chicken. I prefer this to buying ground chicken. It only takes a few extra minutes!

Pulse until coarsely ground.

A few pulses and voila!  Ground chicken.

A few pulses and voila! Ground chicken.

Heat a large nonstick skillet over medium-high heat.  Add 2 tsp. oil to pan; swirl to coat.  Add shallots and sauté 2 minutes.  Add bell pepper; sauté one minute.  Add garlic and cook for another 30 seconds.  Remove shallot mixture from pan and set aside.

Add remaining 2 tsp. oil to pan; swirl to coat.  Add chicken.  Cook and stir 5 minutes or until browned, crumbling with your stirring utensil as it cooks.  Drain well if there is extra juice in the pan.  Reduce heat to medium.  Add chiles; cook one minute.  Add shallot mixture back in.  Stir in fish sauce, brown sugar, soy sauce and black pepper.  Cook one minute or so until everything is heated through and combined well.  Remove pan from heat.  Stir in basil leaves and lime juice.

There is nothing stopping you from just eating this with a fork if you're no fan of lettuce wraps.  Dig in!  Otherwise, load up the wrap of your choice with this yummy concoction!

There is nothing stopping you from just eating this with a fork if you’re no fan of lettuce wraps. Otherwise, load up the wrap of your choice with this yummy concoction!

Serve in lettuce leaves with lime wedges or just dig in with a fork!


Tagged , , , , , , , , , , ,

One Pork Roast, Many Meals – Pineapple Pork Wraps

I hadn’t planned to buy a roast.  The weather is warm, I’m trying to eat lighter, and really, comfort food wasn’t really what was on my menu this week.  But there it was on sale at a great price and it made me think, why not?  Cook once and eat for several days?  Sure.  And why does pork roast have to mean heavy and unhealthy?  It doesn’t.

I let the roast cook in the morning while it was still nice and cool, drained off the fat, shredded the meat and put it all away.  I was going to cook it in the crock pot but it was too big to fit!  This mammoth thing will easily make three or four meals for us.  I decided on quickie sandwich wraps for dinner #1.  I love pork and fruit together and this combo made for a delicious, light dinner.  For these wraps, you can use the pork warm or cold, whichever you prefer.

For the basic pork roast, scroll down for the recipe. I keep it fairly simple so it will work in a lot of different recipes.

Need other ideas for using up leftover pork roast?  Check out BBQ Pulled Pork Sandwiches, Shredded Pork Tacos, or Shepherd’s Pie!

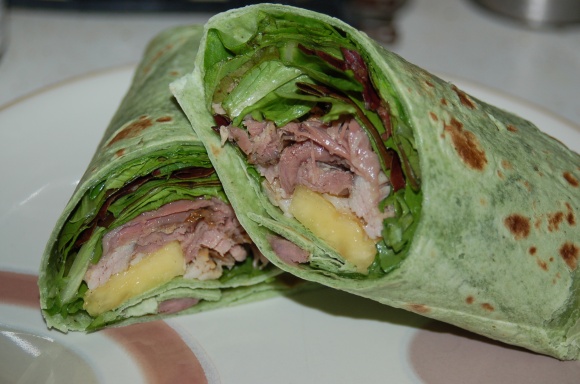
Pineapple Pork Wraps

Pineapple Pork Wraps

Pineapple Pork Wraps

Shredded pork (about 1/2 cup per wrap)
1/2 cup thinly sliced pineapple
Mixed greens
Large wraps (we used the spinach herb wraps)

Pile the ingredients in the middle of the wrap, fold in the ends, roll up and slice in half.  Secure with toothpicks if needed.

Pineapple Pork Wraps

Pineapple Pork Wraps

Basic Pork Roast

Pork Butt or Shoulder Roast
1 onion, sliced or diced
2 cloves garlic
1 8 oz. can diced green chiles
Salt & pepper

Rinse pork roast and place fat side up in a dutch oven.  Sprinkle with salt & pepper, top with onion, chopped garlic and green chiles.  Put a lid on and roast at 350˚ for 3-4 hours, until tender and falling apart.  Pull apart with two forks to shred.

Alternatively you can do this in the crock pot (mine was too big this time, so I did it in the oven instead).  When I cook it in the crock pot, I turn it on high for the first hour, then down to low to cook the rest of the day.

Ready to pop into the oven or crock pot.

Ready to pop into the oven or crock pot.

Tagged , , , , , , , ,