Category Archives: Pizza

Homemade Pizza with “Sun-dried” Tomatoes

One of the best things about overflowing summer produce is the yummy surprises I find in my freezer in the fall. A couple of months ago I had tomatoes coming out my ears and decided to make some mock sun-dried tomatoes in the oven. They were so easy to do, and so delicious. Best of all, they take up a fraction of the space of whole or canned tomatoes, since you can stack them all in a freezer bag and stash them away for later.

Now, you’re probably saying, “fat lot of good this does me in the middle of fall with no garden tomatoes to be found!” Well, on one hand you are right. But on the other hand, this is a great trick to make store-bought tomatoes taste better in the fall and winter. By doing this slow bake, you get rid of the watery, mealy texture of winter tomatoes and bring out all the natural sweetness instead. For extra sweet ones, use the little grape tomatoes! Then use in your favorite pasta, omelet, salad, pizza or whatever!

As with any pizza, feel free to build your own with the ingredients and flavors you like. For this particular pie, instead of sauce I used a simple olive oil and garlic mixture, covered with sun-dried tomatoes. Then top with a scatter of your favorite toppings, some melty mozzarella, and you have a pizza to die for. For a more crispy crust, I recommend using a pizza stone, but if you don’t have one, a parchment lined cookie sheet will do the trick just fine.

Homemade pizza with "sun-dried" tomatoes

Homemade pizza with “sun-dried” tomatoes

Homemade Pizza with “Sun-dried” Tomatoes

1 ball of fresh pizza dough (you can make your own or use a pre-made dough, such as Trader Joe’s)
1 tsp. cornmeal
1 tbsp. olive oil
1-2 cloves garlic, minced
1/4 tsp. dried Italian herbs
1/2 – 3/4 cup sliced “sun-dried” tomatoes (see recipe below or use store-bought sun-dried tomatoes packed in olive oil)
6-7 olives, chopped up, any kind
1 cup fresh spinach, roughly chopped
1 small shallot, sliced thinly and rings separated
1 ball (8 oz.) fresh mozzarella

Remove your ball of dough from the bag, coat in a bit of olive oil and place in a bowl with a towel over it. Let it come to room temperature and rise a bit (usually about an hour is fine). Preheat oven to 450˚ with pizza stone or pan in the oven. While the oven is preheating, prep all your toppings so you can assemble your pizza quickly.

When oven is preheated, remove the stone. Sprinkle stone with cornmeal and press out your dough into whatever shape you want your pizza to be. Since my stone is round I usually go for some sort of roundish, oblong sort of shape. Drizzle with olive oil and scatter garlic and half the herbs over the dough. Rub all around so it’s got a thin coating all over.

Layer on your toppings. I started with tomatoes to mimic “sauce”, then layered spinach, olives, shallots and then cheese on top. Sprinkle with the other half of the herbs.

Bake at 450 for 15 minutes, or until crust is crunchy on the bottom and cheese is melted and starting to brown just a bit on top. Remove from oven and let sit for 5 minutes. Slice into wedges and serve.

"Sun-dried" tomatoes - no sun needed!

“Sun-dried” tomatoes – no sun needed!

“Sun-dried” tomatoes – no sun needed!

Roma tomatoes
Olive oil
Sea salt (plain, or infused)
Fresh cracked pepper (optional)

Preheat oven to 250˚. Line baking sheets with parchment. Slice tomatoes in half lengthwise. Lay out on sheets, sliced side up. Lightly drizzle with olive oil. Sprinkle with sea salt and pepper.

All ready to pop in the oven.

All ready to pop in the oven.

Bake 3-4 hours or until slightly flattened and sun-dried looking. Let cool. Store in freezer bags, and pull out as needed.

Use tomatoes in your favorite dinner.

What are you going to put your sun-dried tomatoes on?

Tagged , , , , , ,

Cheesy Asparagus Tart

It’s summer! Well, maybe not technically for another week or so, but farmer’s market is booming and my CSA boxes started coming this week! Getting a box of fresh veggies from one of my favorite farms every week was one of the highlights of my summer last year and I could not wait to sign up again this year.

My first farm box was green, green, green. Lettuce, chard, kale, asparagus, spearmint, tarragon, spring onions, radishes and dried beans to round it out. There will be lots of salads this week. But first, this lovely tart I found in my Forest Feast cookbook. As far as using up fresh veg this summer, I have a feeling this book will be my constant companion. Beautifully illustrated and easy, easy recipes that really highlight the veggies. Asparagus season is almost over so this one was at the top of my list. It didn’t disappoint.

As usual, I played fast and loose with some of the ingredients based on what I had on hand. Feel free to do the same.

Asparagus Tart

Asparagus Tart

Asparagus Tart
(from The Forest Feast, by Erin Gleeson)

1 sheet puff pastry, thawed (takes 30-40 minutes to thaw at room temp)
15-20 spears of asparagus
Goat cheese (or other soft cheese of your choice, she used Brie in the original recipe)
1 egg, beaten
Dried Italian seasoning or herbs of your choice
Salt & pepper
2 tbsp. chopped walnuts or pine nuts
1 tbsp. capers
1-2 tbsp. parmesan cheese (optional)

Preheat oven to 375˚. Unfold the puff pastry and place on a cookie sheet (greased or lined with parchment). Spread cheese over the puff pastry. Drizzle the beaten egg over the cheese. Place asparagus spears in a row. Sprinkle with other ingredients. Bake for 20-25 minutes until edges are golden brown. Remove from the oven and let sit for a few minutes before slicing.

We served this with a salad and fruit for dinner (also perfect for lunch or brunch!). Using one sheet of puff pastry serves 3-4 people. Easily doubled for more, or can be cut into smaller pieces for appetizers.

Tagged , , , , , , , , ,

Pizza Stuffed Peppers

I came across these giant red bell peppers the other day and they were so pretty (and so on sale!) that I just had to buy them.  And with so many spring colds going around, this seemed like the perfect way to get an extra dose of vitamin C. Did you know red bell peppers have more vitamin C than oranges?

Since the peppers were such a nice shape and good size, stuffing them seemed like the thing to do.  But stuff with what?  As it happens I had all the makings for homemade pizza, except crust.  You know, sometimes things just fall into place.  Obviously a pizza filled pepper was the solution to all my problems.

Now when you’re making a stuffed pepper, you’re faced with two choices:  lop off the top and stuff them whole, or cut them in half and make boats.  Since my peppers were so tall I opted for boats. This has the added benefit of being able to pick it up and eat it like pizza if you so desire (and if you’re willing to wait a bit for it to cool).

These were delicious.  I’m not anti-crust myself, but if you’re searching for a more healthy, low-carb or gluten-free solution to pizza, give this a try!  Feel free to vary the pizza toppings to your liking. I am not listing quantities because really it depends on how big your peppers are and how many you want to eat.

Pizza Stuffed Peppers

Pizza Stuffed Peppers

Pizza Stuffed Peppers

3-4 large red bell peppers (or any color)
Red or yellow cherry tomatoes, halved
Handful of basil, coarsely chopped
Mushrooms
Mozzarella
Pepperoni (optional)
Salt & pepper
Dry or fresh oregano

Preheat oven to 400 degrees. Stuff peppers with veggies, pepperoni (if using) and cheese.  I went for random placement so I could have a bit of everything in each bite.  Don’t overfill or it will just melt everywhere.  Lightly sprinkle with salt & pepper & oregano.  Bake for 20 minutes or so, until cheese is melted and lightly browned on top.

Yum.  Pick it up to eat or slice it up and eat it with a fork.  Up to you.

Yum. Pick it up to eat or slice it up and eat it with a fork. Up to you.

Tagged , , , , , , , ,

Mediterranean Pizza

I can’t remember the last time I went out for pizza.  There are a few places I like in town, but none are very close to my house, and it usually just seems like too much trouble.  I’ve found it’s much easier to make my own, especially if I want a healthy-ish, gourmet-ish sort of pizza.

I threw this together with a few ingredients I had on hand, and the result was a tasty, Mediterranean style pizza that disappeared in the blink of an eye!  I read an article recently about ingredients you should never put on pizza, and I think spinach was on the list, but what do they know?  I actually really like it on pizza, especially if you cook it at a high enough temp that it gets a little crispy on the edges instead of just wilting.  Because nobody likes a soggy pizza.  This is a great way to get some extra veggies into the little ones (and the big ones!) without it seeming like rabbit food.

If you have a Trader Joe’s in the vicinity, they make a great fresh pizza dough that you can find in their refrigerated section.  It comes in plain or garlic-herb varieties.  If you don’t have a TJ’s close to you, you can use any pizza dough that suits you.

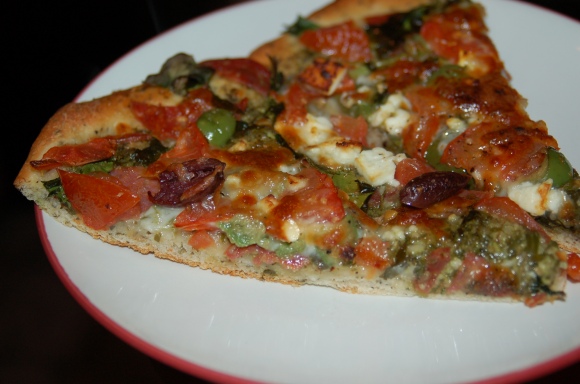
Mediterranean Pizza

Mediterranean Pizza

Mediterranean Pizza

Garlic-herb fresh pizza crust (I used Trader Joe’s pizza crust, but whatever kind you like will work)
1/2 cup basil pesto (click here for my pesto recipe or use store bought)
Pepperoni
1 tomato, sliced or diced
1 cup spinach, coarsely chopped
Assorted olives (I used kalamata and some green Italian ones)
1/2 cup feta
1/4 cup mozzarella
Fresh ground pepper

Preheat your oven to 450 degrees.  If you have a pizza stone, go ahead and preheat that too, otherwise you can use any baking pan.  Flatten your dough out with your hands into whatever shape suits you (I usually just make it whatever shape of pan I’m using). Make it as thin or thick as you like.

Spread pesto evenly over crust.

It doesn't have to be perfect, just try to get a little bit all over it.

It doesn’t have to be perfect, just try to get a little bit all over it.

Layer  pepperoni and spinach.


Pepperoni and spinach.  For a vegetarian version simply leave out the pepperoni.

Pepperoni and spinach. For a vegetarian version simply leave out the pepperoni.

Pile on the other toppings, sprinkling evenly over crust. Finish with a few grinds of black pepper, or if you like it spicy, scatter a bit of crushed red pepper over the top.

Tomatoes, olives and cheese scattered on top.  Doesn't that look gorgeous?

Tomatoes, olives and cheese scattered on top. Doesn’t that look gorgeous?

Bake for 12-15 minutes, until crust is lightly browned on the edges and bottom.  I like a crispy crust, so I sometimes cook an additional minute or two.  For a softer crust, take it out a bit sooner.

Let it set for a few minutes before slicing.  Cut into wedges and try not to burn the roof of your mouth when you dive in!

Mmmmm!

Mmmmm!


Tagged , , , , , , , , ,

Spicy Homemade Taco Pizza

My baby brother (one of them) was born when I was 14.  Now while that was all very exciting, the part leading up to that was pretty cool too.  That was the part where my mom was craving Godfather’s taco pizza and raspberry ripple ice cream.  We ate a lot of taco pizza that summer.  Ever since that time, I have loved it.  These days, I hardly ever see it offered at pizza places, and when I do, it’s just not the same.  So, as I am wont to do, when I was having a craving recently I just made up my own.  I saw a recipe somewhere where the dressing was drizzled on top and I thought that was a pretty great idea so I copied that idea on mine.  Added a nice spicy zip!

If you are lucky enough to have a Trader Joe’s in the vicinity, check out their fresh pizza dough, which you can find in the produce section.  Otherwise, use the brand you like best (or make your own).

Now…where can I find some raspberry ripple ice cream?

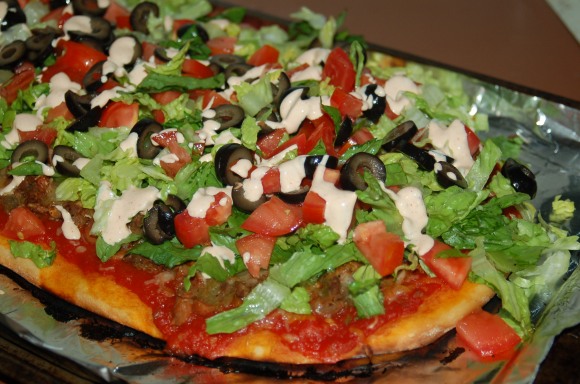
Spicy Homemade Taco Pizza

Spicy Homemade Taco Pizza

Spicy Homemade Taco Pizza

Pizza Crust (I use the fresh pizza dough from Trader Joe’s, but use your favorite)
1/2 pound ground beef
1 can pinto beans, drained and rinsed
1/4 cup chopped onion
1 clove garlic, minced
1 tsp. cumin
1 tsp. chili powder
4 oz. can green chiles
1 cup crushed tomatoes (canned or fresh)
1/2 jalapeno, minced (leave out if you don’t like it spicy)
1 cup shredded cheddar cheese
1 cup shredded lettuce
1 large tomato, diced
Salt
Sliced black olives
1/2 cup sour cream
Juice of one lime
2 tbsp. hot sauce (I used Cholula)

Preheat oven to 425˚.  Line a baking sheet with foil or parchment.  Press out pizza dough with your fingers until it’s the thickness you like.

Heat a large skillet over medium heat.  Add ground beef and onion and cook until beef is no longer pink.  Add beans, garlic, cumin, chili powder and green chiles. Stir and sort of mash the beans into the mixture. Cook until heated through.  Set aside.

Mix crushed tomato and minced jalapeno.  Spread over pizza crust.

tacopizza

Spread meat mixture over tomato sauce.

tacopizza2

Sprinkle shredded cheese over the top of the meat mixture.  Bake for 10-15 minutes until crust is browned on the bottom, and crispy around the edges.

tacopizza3

Remove from oven and spread lettuce, tomatoes and olives over the top.  Whisk together sour cream, lime juice and hot sauce.  Drizzle over the top of pizza (you can do this with a spoon or put in a ziplock bag and snip off a corner).  Cut into squares and eat up!

tacopizza5

Tagged , , , , ,

Baby Lasagnas

Pinterest is a tiny addiction of mine.  Equal parts inspiration and time suck. I like to go and browse and discover and pin things that I’m sure I will create at some point.  And sometimes I do.  But sometimes the pins sit there on my board, unloved and unmade.  The other day I made a list of about 70 (!) recipes that I had pinned that I REALLY wanted to make (and no, that’s not all of them, and yes, I’ve pinned more since).  I’m systematically making my way through the list over the next 2-3 months.

This is a recipe I pinned quite a while ago from one of my favorite blogs, Can You Stay For Dinner?, and I’m thrilled to report they turned out every bit as good as I had hoped, and have come to expect from her recipes.  My version is slightly different from the original (is this any surprise?). Quick to make and seriously, who doesn’t love lasagna that bakes in 10 minutes?  No doubt I’ll be making these again.

Baby Lasagna!  Adorable.  And delicious!

Baby Lasagna! Adorable. And delicious!

Baby Lasagnas
(adapted from canyoustayfordinner.com)

6 oz. lean ground beef
1-2 Italian sausage links
1 cup chopped onion
Salt & pepper
3/4 cup chopped mushrooms
1 1/2 cups crushed tomatoes (I used about 2/3 of a 28 oz. can)
2 cloves garlic, minced
3 tsp. dry oregano, divided
1/4 cup red wine (optional
2 tbsp. fresh basil, chopped (or sub 1/2 tsp. dry basil)
1 1/4 cup ricotta cheese
24 square wonton wrappers (found in the produce section)
1 1/2 cups shredded mozzarella cheese

Preheat oven to 375˚.  In a large skillet crumble beef.  Remove casings from sausage links and crumble that in there too.  Add mushrooms and onions.  Sauté until meat is no longer pink.  Add garlic and cook and stir a minute more.  Add tomatoes and 2 tsp. of oregano, a pinch of salt and pepper, and red wine.  Bring to a boil, then turn down to a simmer and cook for 10 minutes or so.  Set aside.

Yummy red sauce.  My version uses lean versions of beef & Italian sausage.

Yummy red sauce. My version uses lean beef & Italian sausage.

In a small bowl mix ricotta cheese with 1 tsp. oregano, a few grinds of pepper and fresh basil. Mix well and set aside.

Creamy, delicious ricotta mixture.  Yum.

Creamy, delicious ricotta mixture. Yum.

Coat a 12-cup muffin tin with cooking spray.  Place one wonton skin in the bottom of each cup, pressing firmly to the bottom and sides.  Divide half the meat sauce among the lasagnas, placing a spoonful or so in the bottom of each cup.

babylasagna3

Top with half the ricotta mixture.  I dropped a spoonful on each one and then gave it a little smear to smash it down a bit.

babylasagna4

Sprinkle with half the mozzarella.

babylasagna5

Gently press another wonton skin on top of the cheese.

One more time...with feeling!

One more time…with feeling!

Repeat the above sequence, with sauce, ricotta and mozzarella.

Ready to go in the oven.

Ready to go in the oven.

Bake for 10 minutes.  Remove from oven and let cool for 5 minutes or so.

After they are cool, insert a butter knife down the side and gently lift it out.

After they are cool, insert a butter knife down the side to gently lift it out.

Remove from muffin tin and serve.  Makes 12 baby lasagnas.

Mmmm.

Mmmm.

Tagged , , , , , , , , , , , , ,

Perfect Pesto

I’ve written entries that involve pesto before, but I don’t think I’ve ever done one JUST for pesto.  But I just made a fresh batch and thought it was blog-worthy all by its lonesome.

Maybe you’ve bought pesto at the store.  If you have you know it can be a little on the spendy side, and sometimes it’s not that wonderful either.  Much more economical to make it yourself, and you can’t beat the taste.

Welcome to my basil patch. I’m normally a pretty lousy gardner, but halfway through summer these are looking pretty great, huh?  Although I kill many plants, I usually do well with basil.  Here I have purple basil, Thai basil, and sweet Italian basil (probably your most common variety).

My basil patch.  Pay no attention to the accompanying weed patch.

My basil patch. Pay no attention to the accompanying weed patch.

I bought my basil plants for $2.50 each at farmer’s market, but you can find them all over the place this time of year. If you keep pinching the little flowers off the tops, they will keep growing for most of the summer, especially if you harvest fairly frequently.  I’m about ready to chop another bunch off of these.

I keep the other ingredients for pesto on hand most of the time, so whipping up a batch is super fast, which is good because I love this stuff.  Sandwich spread, pizza topping, tossed with pasta, spread over fish or chicken, mixed into salad dressing, beaten into scrambled eggs…it’s delicious just about any way you can think to eat it.

Perfect Pesto

Perfect Pesto

Perfect Pesto

2 cups fresh basil leaves (remove any large stems)
2-3 tbsp. walnuts
2-3 tbsp. pine nuts
1/4 tsp. crushed red pepper
1/2 cup grated parmesan
3 cloves garlic
Salt & pepper
Olive oil (around 1/2 cup)

Put all ingredients except oil into a food processor.

All ready to whirl up.

All ready to whirl up.

Pulse until ingredients are finely chopped, scraping down the sides once or twice to make sure everything is incorporated.  (Pulsing instead of puréeing is better since it doesn’t mangle the basil as much, which will result in brighter pesto color!) Drizzle olive oil in a little at a time until the mixture is the consistency you like.  I prefer it to be spreadable, but not soupy.  Taste for seasoning, add salt & pepper if needed.

Be sure to add the oil slowly so it can incorporate as it blends.  That way you can really control the thickness.

Be sure to add the oil slowly so it can incorporate as it blends. That way you can really control the thickness.

Store in an airtight container with a lid.  After putting the pesto in the container, drizzle with a layer of olive oil or cover with plastic wrap (set right on top of the pesto).  This will help keep it from turning brown.  It will keep in the fridge for 1-2 weeks.  It also freezes well.  I usually store mine in smallish containers so I can have one in the fridge and the rest in the freezer to dole out as needed.

Tagged , , , , , , ,

Quickie Greek Pizza

It’s hard to get much quicker than this little weeknight treat.  It’s so easy I’m not sure it actually qualifies as a recipe, but here it goes anyway.

I buy hummus from a stand at farmer’s market a pretty regular basis.  With so many varieties there is always a new one to try.  But beyond the dipping extravaganza, who knew that it would work just great as a pizza topping?  Well now we know.  Combined with a pita and Greeky sorts of toppings it was just lovely.  And pretty healthy too, gotta like that!

Quickie Greek Style Pizza

Quickie Greek Pizza

Quickie Greek Pizza

1 Greek style pita
2-3 tbsp. hummus, whatever variety you like best
Kalamata olives
Sun-dried tomatoes (I usually use the kind packed in olive oil)
1 tsp. pine nuts
Feta, mozzarella or queso fresco

As you can see from my stellar measurements here, I usually don’t measure anything.  Simply spread the hummus over the pita and sprinkle toppings on in whatever quantity you like!  Crumble some cheese on top and grind a bit of pepper on top.

Now of course you could just eat it like this.  But if you want it hot and crispy, cook it!

Now of course you could just eat it like this. But if you want it hot and crispy, cook it!

For a nice crisp crust, I cooked mine right on the oven rack.  About 10 minutes at 375˚ or until it’s melted and crispy on the bottom.

If you want it less crispy, put it on a pan first and don't cook it as long.

If you want it less crispy, put it on a pan first and don’t cook it as long.

Tagged , , , , , ,

The Sleepover Solution: Build Your Own Pizza Bar

The giggling still echoes in my ears.  Four thirteen-year-old girls can make a lot of noise.  And apparently require almost no sleep.  In any case I know one thing:  A key element of a successful sleepover is the food.  The build your own pizza bar is one we’ve done a couple times and it’s always a rousing success.  Not only is it delicious, but it’s also a fun activity for the kids, no matter what age they are.

While this is perfect kid food, I’ve been known to do this with my grown up friends too.  Everybody gets just what they like, and it’s great if you have a group that includes vegetarians, or others on a special diet.  I love to use the little ciabatta rolls, or a french baguette cut into pieces. If you have gluten-free or low-carb folks in your group you can use gluten free buns, stuff toppings in a pepper half or toss with salad greens for a pizza salad.

We followed up with Frost Your Own Cupcakes for dessert. Yum!

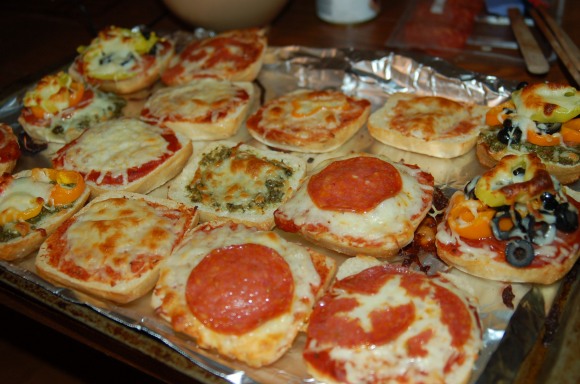
Our masterpieces!

Our masterpieces!

Build Your Own Pizzas

Ciabatta rolls or French baguette, cut into 3-4″ pieces.
Pizza sauce
Pesto (I like to offer an alternative to tomato sauce in case of allergies, etc.)
Mozzarella
Assorted pizza toppings of your choice.  We used:
Banana pepper rings
Sliced red & yellow peppers
Pepperoni
Olives

The pizza bar.  It can be simple or elaborate.  Basic or gourmet.  It's up to you!

The pizza bar. It can be simple or elaborate. Basic or gourmet. It’s up to you!

Put all the ingredients out, make sure you have plenty of utensils for spreading and scooping ingredients.  Have everybody wash their hands first and then make their own pizzas.  Preheat the oven to 400˚.  Lay out a baking sheet or two on which to place the finished masterpieces.  I always recommend they put some sort of marker on their pizzas so they will know which ones are theirs, or just remember where they put it.

Bake for 8-10 minutes, until the cheese is melted and starting to brown on top.  Remove from oven and let cool a minute or so.  Clear out while the hungry horde descends.


Tagged , , , , , ,

Farmer’s Market Pita Pizza

I almost forgot to go to Farmer’s Market this weekend.  At the last minute, I remembered I had no veggies in my fridge, and if it wasn’t the market, it was a trip to the grocery store instead.  I chose the market.  I arrived with only a few minutes to spare, in fact some of the vendors were already breaking down their booths.  So I embarked on what surely was the quickest, most efficient farmers marketing I have ever done, rushing through and grabbing a few goodies here and there without giving it too much thought.  It was actually a lot of fun, and I ended up with an armful of random items that somehow go really well together.  Plus I scored a gorgeous flower bouquet, greatly discounted.  I’d like to think it was because I was looking especially fetching that day, but truth is, he probably just wanted to go home.  Maybe both. 🙂

Farmer’s market goodies! Gorgeous flowers, new potatoes, goat cheese, beets, dill, carrots, sweet onions, raspberries and look at those beautiful tomatoes!

So for dinner, obviously I couldn’t wait to dip into my treasure trove of goodies.  I had a couple things left from my last trip to the market that needed to get used up – some pita bread and Italian salami.  Combined with some of fresh goat cheese and freaking amazing tomatoes from this trip, plus some basil from my garden, I had myself a pizza to die for.

My beautiful pizza!

Farmer’s Market Pita Pizza

1 greek pita or flatbread
1 small to medium size tomato, sliced
fresh basil
olive oil
goat cheese
dry salami

Drizzle the pita with a tiny bit of olive oil.  Arrange tomatoes over the top to cover the surface.  Sprinkle with salt & pepper.  Scatter salami and basil over the top and dot with blobs of goat cheese.  Add another little drizzle of olive oil.

Building the perfect pizza. You really don’t even need to cook it if you don’t want to.

Broil for 5 minutes or so until the cheese is melty and the crust is browned around the edges.  Cut into wedges and eat!


Tagged , , , , , , , , , ,